How to Stream With Raspberry Pi Zero 2 W and Arducam IMX 519
Introduction
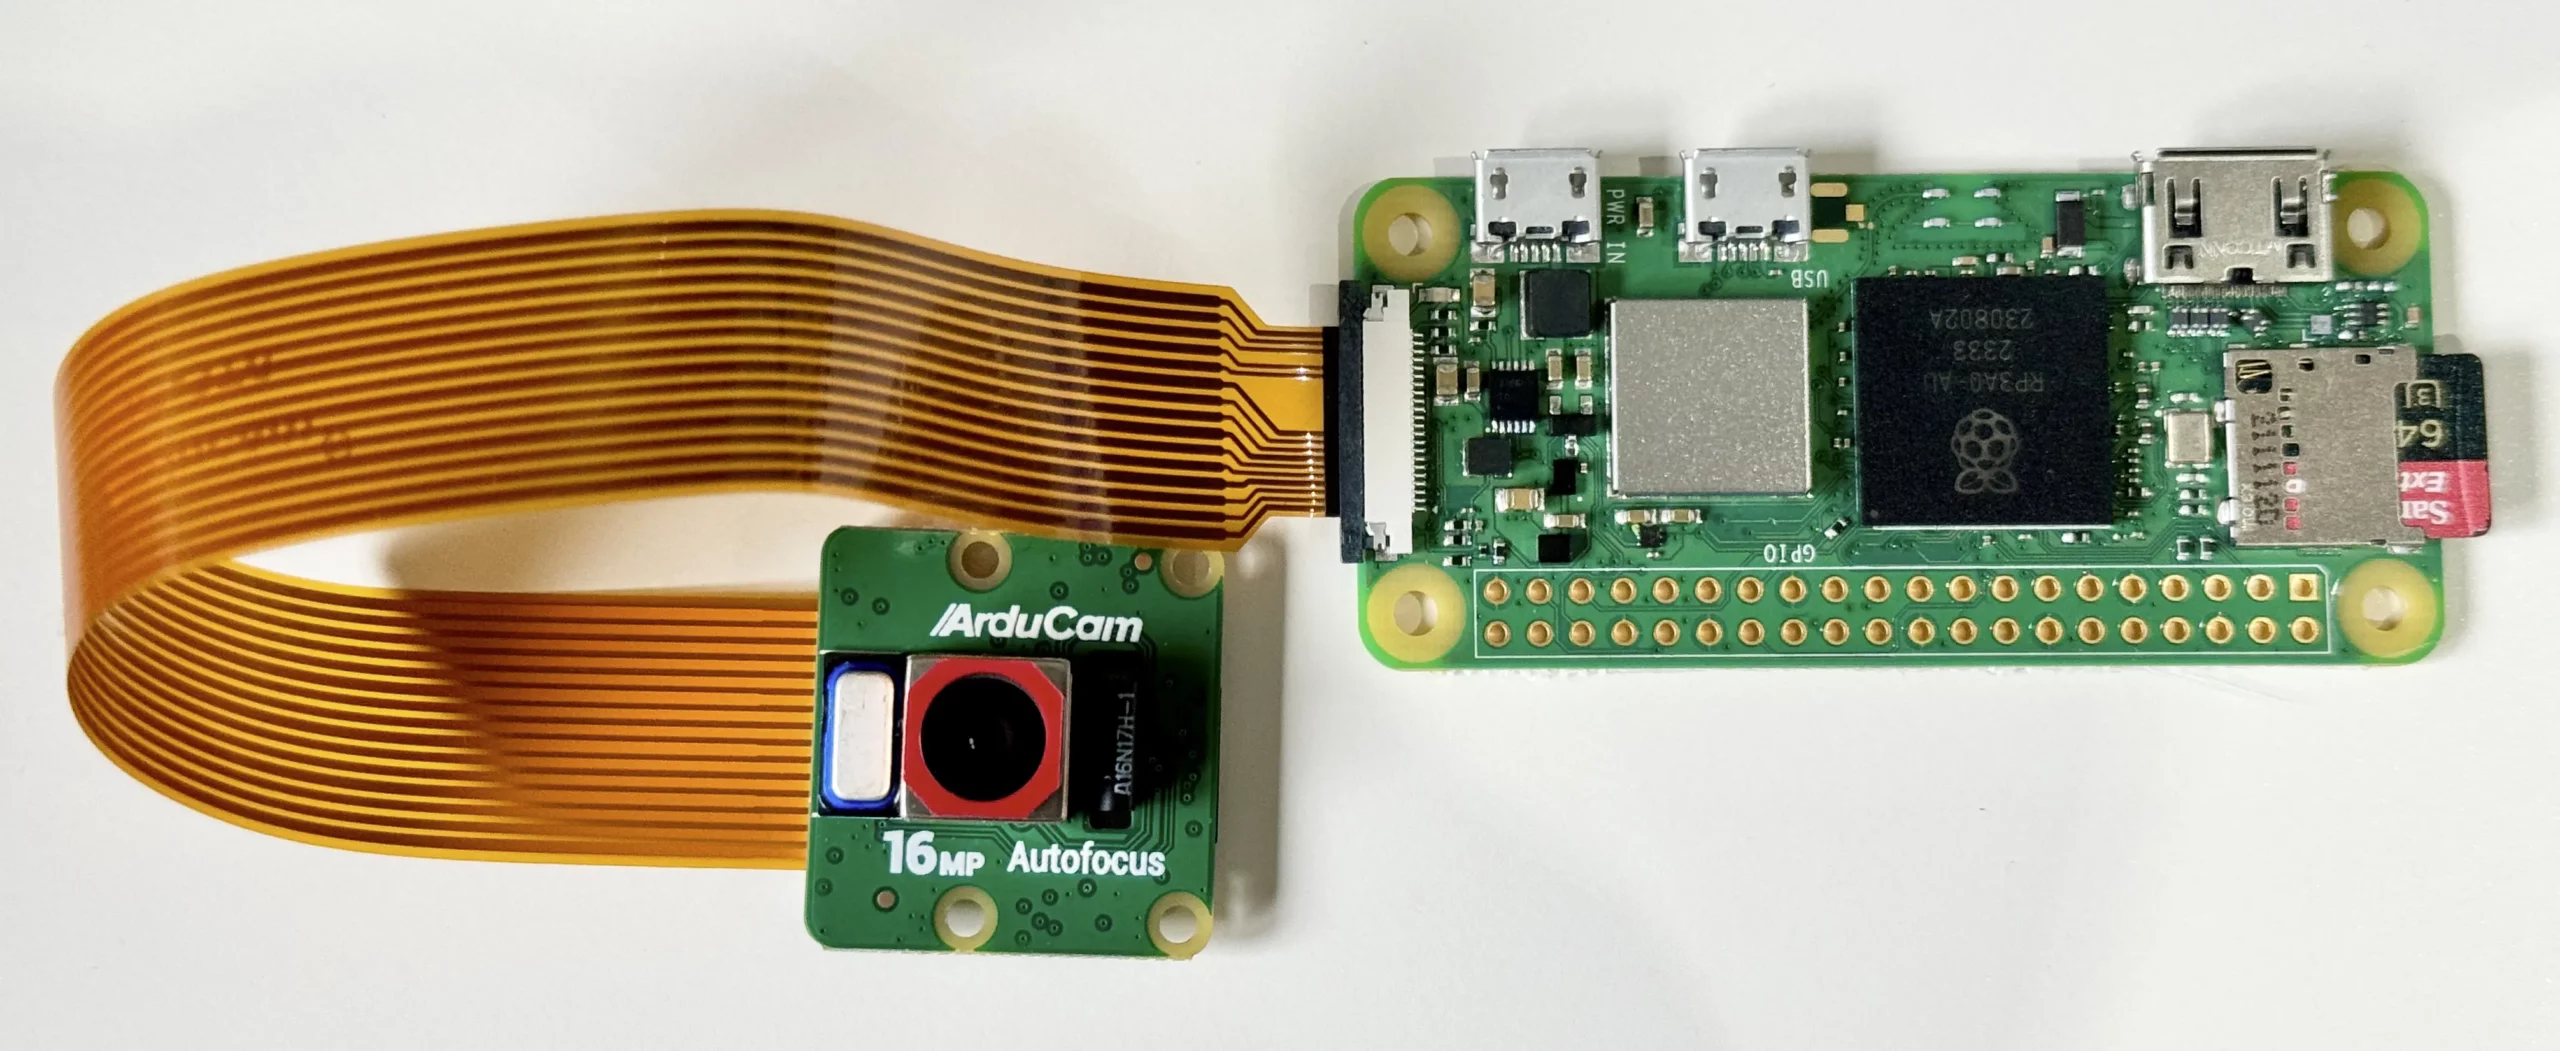
This tutorial covers installing and using the Arducam IMX 519 16 mp camera along with the Raspberry Pi Zero 2 W.
Please note that the tutorial will require specific hardware. Kindly ensure that you have the necessary components to complete the tutorial successfully.
- A Raspberry Pi Zero 2 W;
- An Arducam IMX519 camera; and
- A host machine.
If you would like to purchase a Raspberry Pi Zero 2 W or the Arducam IMX519, here are some affiliate links:
Raspberry Pi Zero 2 W on amazon.co.uk
To follow along, it's important to make sure that you have Raspbian Bullseye with a headless install set up on your Raspberry Pi. To get started, you can take a look at the following guide
https://albert-fit.com/how-to-set-up-raspberry-pi-zero-2-w-headless-mode/
Arducam IMX 519 Driver
The first step is to download the bash scripts required for installing the IMX519 driver.
Modify /boot/config.txt
sudo nano /boot/config.txt
add dtoverlay=imx519 under the line [all]

#Save and reboot
To clarify, modifying the line dtoverlay=imx519 in the /boot/config.txt file on a Linux system enables and configures a specific device tree overlay, such as the imx519 sensor.
Here's a breakdown of what this means:
- Device Tree Overlays (DTO): A device tree is a data structure that describes the hardware components of a particular computer so that the operating system's kernel can use and manage those components. Overlays are additional information that can be dynamically loaded to modify the device tree at boot time. This is particularly useful in systems like the Raspberry Pi, where the exact hardware configuration might not be known beforehand.
- IMX519: This is likely a reference to a specific hardware component, specifically the image sensor. The IMX519 is a model of an image sensor made by Sony, commonly used in cameras and mobile devices for capturing images, as well as the Arducam 16mp camera.. By specifying
dtoverlay=imx519, the configuration instructs the operating system to load the device tree overlay for this specific sensor. This ensures the kernel has the correct information to interact with and control the IMX519 sensor.
Download the Bash script
wget -O install_pivariety_pkgs.sh https://github.com/ArduCAM/Arducam-Pivariety-V4L2-Driver/releases/download/install_script/install_pivariety_pkgs.sh
Here's a breakdown of each part of the command:
wget: This is a free utility for non-interactive downloading of files from the web. It supports HTTP, HTTPS, and FTP protocols, as well as retrieval through HTTP proxies.-O install_pivariety_pkgs.sh: The-Ooption inwgetallows you to specify the name of the file where the downloaded content will be saved. In this case, the content downloaded from the given URL will be saved to a file namedinstall_pivariety_pkgs.shon your local system. If you don't use the-Ooption,wgetwill use the filename in the URL by default.https://github.com/ArduCAM/Arducam-Pivariety-V4L2-Driver/releases/download/install_script/install_pivariety_pkgs.sh: This is the URL of the file you want to download. In this case, it's a shell script hosted on GitHub, designed explicitly for installing Arducam Pivariety V4L2 Driver.
When you run this command, wget will connect to the GitHub server and download the install_pivariety_pkgs.sh script, save it to a file with the same name in your current directory.
Change the script permissions
chmod +x install_pivariety_pkgs.shThe command chmod +x install_pivariety_pkgs.sh is used to change the file permissions of the script install_pivariety_pkgs.sh. Let's break down this command:
chmod: This is a Unix command used to change the permissions of a file or directory. Permissions dictate who can read, write, or execute the file or directory.+x: This part of the command is an argument tochmodthat specifies the change to be made to the file's permissions. The+xmeans "add execute permission." In Unix-like operating systems, a file must have execute permission to be run as a program.install_pivariety_pkgs.sh: This is the file name whose permissions you are changing. In this case, it's the script that you previously downloaded usingwget.
By running chmod +x install_pivariety_pkgs.sh, you are adding execute permissions to the install_pivariety_pkgs.sh script. This means that after running this command, you (and other users with appropriate permissions) can run this script as a program on your system. This step is often necessary for scripts downloaded from the internet, as they typically do not have execute permissions set by default for security reasons.
Install the kernel driver
./install_pivariety_pkgs.sh -p imx519_kernel_driver_low_speedThe command ./install_pivariety_pkgs.sh -p imx519_kernel_driver_low_speed executes a script with specific arguments. Let's break down this command:
./install_pivariety_pkgs.sh:.: This represents the current directory in Unix-like operating systems./: This is the directory separator.install_pivariety_pkgs.sh: This is the name of the script you want to execute.
./before the script name indicates that it is in the current directory and you want to execute it. This is necessary because, in most Unix-like systems, the current directory is not in the PATH by default for security reasons. Thus, to run a script from the current directory, you need to specify the path explicitly, and./is the way to do that.-p imx519_kernel_driver_low_speed:-p: This is an argument that the scriptinstall_pivariety_pkgs.shis designed to accept. The meaning of-pis specific to the script itself. The help function lists -p as "Specify Package Name".imx519_kernel_driver_low_speed: This appears to be another argument to the script, likely specifying a particular package or module to be installed or configured. In this context, it seems to refer to a lower-speed version of the kernel driver for the IMX519 camera sensor.
When you run this command, the script install_pivariety_pkgs.sh is executed, and it receives -p imx519_kernel_driver_low_speed as its argument. This triggers the installation of the low-speed kernel driver for the IMX519 sensor.
libcamera-dev and libcamera-apps Installation
./install_pivariety_pkgs.sh -p libcamera
./install_pivariety_pkgs.sh -p libcamera_appslibcamera and libcamera-apps are particularly relevant when using Arducam cameras on the Raspberry Pi because libcamera provides the underlying support for camera hardware. In contrast, libcamera-apps offers practical examples of how to use the library in real-world applications.
- bcamera:
- Purpose:
libcamerais a complex, cross-platform camera support library designed for embedded and mobile devices. It aims to provide a modern and easy-to-use API for camera hardware control. - Features: The library abstracts the details of controlling different types of camera hardware, providing a unified interface for application developers. It supports a range of camera operations and features, including complex image processing and camera control algorithms.
- Cross-platform Compatibility:
libcamerais designed to work across different operating systems and hardware platforms, making it a versatile choice for camera applications in diverse environments. - Use Cases: It is particularly useful in systems where direct control of camera hardware is needed, such as in smartphones, tablets, and embedded devices like the Raspberry Pi.
- Purpose:
- libcamera-apps:
- Purpose:
libcamera-appsare applications or tools built on top of thelibcameralibrary. They serve as examples or utilities for usinglibcamera. - Functionality: These apps typically demonstrate how to perform common camera operations like capturing still images, recording video, or applying image processing techniques using
libcamera. - Examples: Common examples of
libcamera-appsmight include a basic camera app, a video recording tool, or a streaming application. - Developer Utility:
libcamera-appscan be helpful for developers as reference implementations or starting points for building their own camera-based applications.
- Purpose:
Testing the camera
Open up Real VNC (or similar) and connect to the remote desktop.
Alternatively, plug in a monitor to the mini HDMI port.
This shows if you have correctly installed the camera to the PI.
libcamera-hello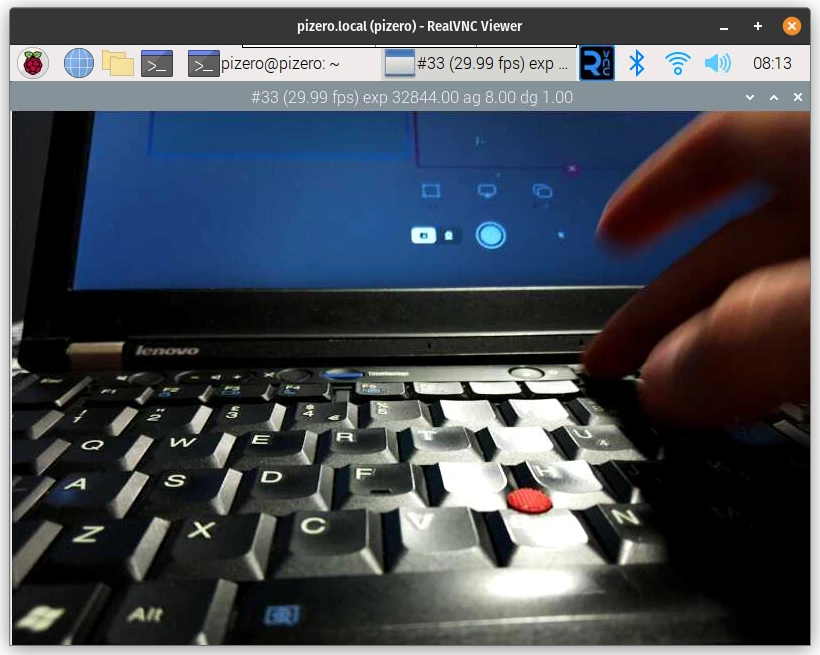
You can also try to take a still image and a video which will be saved in ~.
libcamera-still -t 0 --autofocus-mode auto -o test.jpg

libcamera-vid -t 10000 -o test.h264
Installing VLC
Installing VLC can take a while.
sudo apt install -y vlcAllow VLC to be run as root. This is needed for the streaming to start.
sudo sed -i 's/geteuid/getppid/' /usr/bin/vlcDetecting your camera
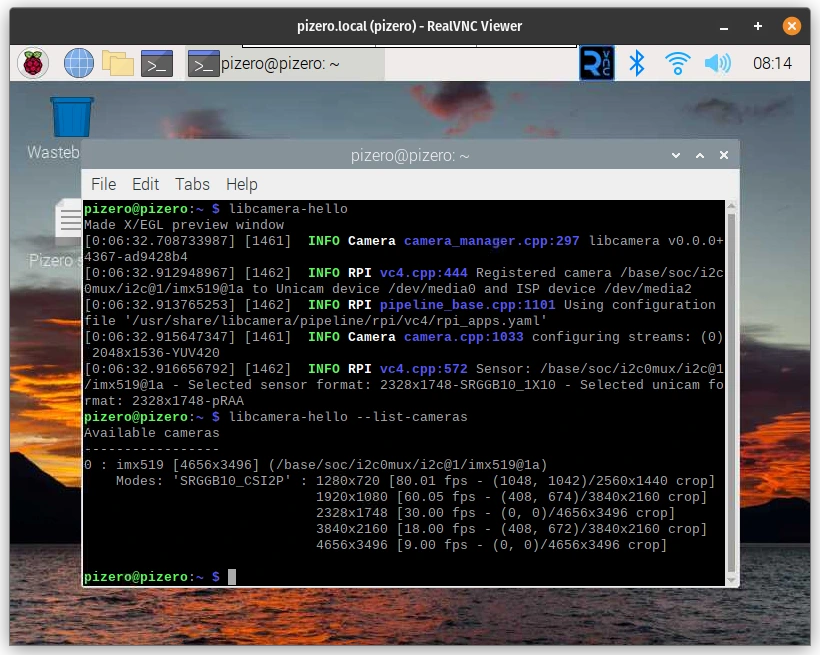
You can list your camera with libcamera-hello, which will allow you to detect the optimal resolution.
libcamera-hello --list-camerasThe output code should look similar to the following snippet.
Creating a streaming script
You can use nano to create the stream.sh file.
sudo nano ~/stream.shThe following are the contents for the stream.sh file.
You might want to experiment with the resolution, frame rate and other parameters.
--vflip and/or --hflip are used for correcting the view.
You can also set up authentication. Replace the username and password with your preferred credentials.
#!/bin/bash
libcamera-vid -t 0 --inline --width 1920 --height 1080 --framerate 15 -o - | cvlc -vvv stream:///dev/stdin --sout '#rtp{sdp=rtsp://:8554/stream}' :demux=h264 --sout-rtsp-user=username --sout-rtsp-pwd=password
Breaking down the streaming script
This command is a Bash script that combines two commands to capture video from a camera and stream it over RTSP (Real-Time Streaming Protocol) with VLC media player. Let's break down each part:
#!/bin/bash: This is the shebang line that tells the system to execute this script with the Bash shell.libcamera-vid -t 0 --inline --width 1920 --height 1080 --framerate 15 -o -:libcamera-vid: A command-line tool to capture video from a camera, typically used with Raspberry Pi cameras.-t 0: Sets the timeout to 0 seconds, meaning the capture will continue indefinitely.--inline: Enables inline headers for H.264 encoding.--width 1920 --height 1080: Sets the video resolution to 1920x1080 pixels.--framerate 15: Sets the video frame rate to 15 frames per second.-o -: Specifies the output to standard output (stdout).
|: This pipe symbol takes the output of thelibcamera-vidcommand and uses it as the input for the next command.cvlc -vvv stream:///dev/stdin:cvlc: The command-line interface for VLC media player.-vvv: Increases the verbosity level to provide more detailed logging.stream:///dev/stdin: Tells VLC to read the video stream from standard input (stdin), which is the output fromlibcamera-vid.
--sout '#rtp{sdp=rtsp://:8554/stream}':--sout: Specifies the streaming output chain for VLC.#rtp{sdp=rtsp://:8554/stream}: Configures VLC to use RTP (Real-Time Protocol) and sets up an SDP (Session Description Protocol) announcement for RTSP at port 8554 with the path/stream.
:demux=h264::demux=h264: Specifies that the input stream is in H.264 format.
--sout-rtsp-user=username --sout-rtsp-pwd=password:--sout-rtsp-userand--sout-rtsp-pwd: These options set the username and password for the RTSP stream, providing basic authentication.
In summary, this script captures video from a camera using libcamera-vid, encodes it in H.264 format, and streams it over an RTSP server using VLC, with access controlled by a username and password.
Security Recommendations
Note that while this method adds a basic level of security, it's essential to consider additional security measures, especially if the stream is sensitive or needs to be highly secure.
Securing RTSP (Real-Time Streaming Protocol) streams is important to prevent unauthorised access and ensure the privacy and integrity of the video data. Here are some recommendations for enhancing security over RTSP:
Internal security
- Use Strong Authentication: Implement strong username and password authentication for RTSP streams. Avoid using default or easily guessable credentials. Regularly update the credentials and use a robust authentication mechanism.
- Implement Transport Layer Security (TLS): Use TLS to encrypt the RTSP stream. TLS provides a secure communication channel by encrypting the data transmitted between the server and the client, thus protecting against eavesdropping and man-in-the-middle attacks.
- Use Secure Real-Time Transport Protocol (SRTP): SRTP is an extension of RTP (Real-Time Protocol) that provides encryption, message authentication, and integrity for media streams. It ensures that the content of the video stream is secure and has not been tampered with.
Network Security
- Network Segmentation: Place your streaming devices on a separate network segment or VLAN to isolate them from other parts of the network. This reduces the risk of unauthorized access from other devices on the network.
- Firewall and Access Control: Configure firewalls to restrict access to the RTSP stream. Allow access only from trusted IP addresses or networks. Implement access control lists to define who can access the stream.
- Regular Updates and Patching: Keep your streaming software, firmware, and any associated components up to date with the latest security patches and updates. This helps protect against known vulnerabilities.
- Monitor and Log Access: Keep logs of access to the RTSP stream and monitor them for any unusual or unauthorised activity. This can help in identifying and responding to security incidents.
- VPN for Remote Access: If you need to access the RTSP stream remotely, consider using a Virtual Private Network (VPN). A VPN provides a secure tunnel over the internet and can prevent unauthorized access to the stream.
- Disable Unused Services and Features: Turn off any services or features of the streaming device or software that are not being used. This reduces the attack surface and potential vulnerabilities.
- Physical Security: Ensure that the physical security of the streaming devices is robust. This includes securing access to the devices themselves and the locations they are monitoring.
Enabling the Streaming Script as a Service
Setting the permissions for the streaming script
Now you have to enable the script file to be executed:
Note: Replace pizero with your pi username.
sudo chmod +x /home/pizero/stream.shEnabling stream.service
sudo nano /lib/systemd/system/stream.servicePaste the following in it (keeping in mind that pizero is the user in /home/pizero/stream.sh and you will need to replace with your own user):
[Unit]
Description=Custom Webcam Streaming Service
After=multi-user.target

[Service]
Type=simple
ExecStart=/home/pizero/stream.sh
Restart=on-abort

[Install]
WantedBy=multi-user.target
Set the correct permissions on the service file:
sudo chmod 644 /lib/systemd/system/stream.serviceThis permission setting (644) is commonly used for configuration files and scripts that should not be executed but must be readable and editable by the owner.
644: This is the numeric mode, which represents the new permissions for the file. In Unix-like systems, file permissions are represented by three sets of digits. The first digit represents the user's permissions, the second digit represents the group's permissions, and the third digit represents others' permissions.
- The digit
6(which stands forrw-in symbolic notation) grants the user (owner) read and write permissions but not execute permission. - The digit
4(which stands forr--) grants read-only permission. This is applied to both the group and others.
Create the service on the system
sudo systemctl enable stream.serviceBy running sudo systemctl enable stream.service, you are instructing systemd to create the necessary links and configurations to start the stream.service automatically whenever the system boots up. This is particularly useful for background services or daemons running whenever the system is operational, such as making sure your rtsp server spins up as soon as the Raspberry Pi Zero 2 W boots up.
Start the service.
sudo service stream startRunning sudo service stream start, you are instructing the system to start the stream service. This is typically used to activate daemons or background services that need to run continuously or are required for the functioning of other parts of the system.
It's important to note that in systems that use systemd (which has become the default in many modern Linux distributions), the systemctl command is generally used instead of service. However, the service command is still present for compatibility reasons and is often a wrapper around systemctl in such systems.
Check the status of the service
sudo service stream status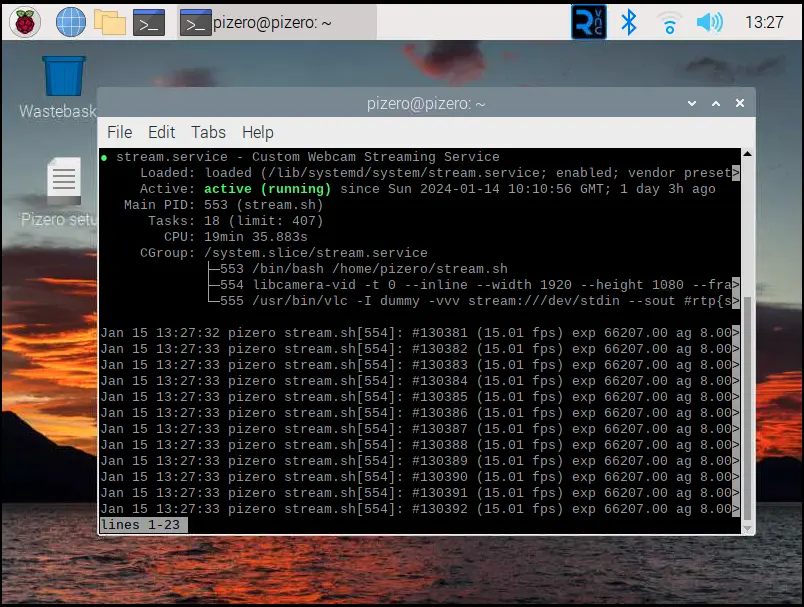
You are good to go as long as Active displays as active (running).
Checking the streaming on your desktop
Start VLC media player and navigate to Media -> Open Network Stream (or press CTRL + N).
Enter URL as follows:
rtsp://pizero.local:8554/stream
Replace pizero with your specific hostname.
At this point, VLC will ask you for the username and password you set up.
Conclusion and References
Congratulations! You have now set up your Raspberry Cam Zero 2 W with the Arducam IMX519 to broadcast over RTSP.
You can check out more detail on the setup at the following links: