Introduction
Have you bought a Raspberry Pi and a ribbon camera like the Arducam, hoping to set it up with MotionEye as discreet CCTV with motion detection? Have you found that your camera needs to be recognised under the MMAL section (or any)? Let's explore what is happening and present a potential fix.
Background Information
MotionEye and MotionEyeOS are open-source interfaces for CCT and intruder detection. They work on Linux environments like Raspbian and allow for multiple camera connections. Each feed has a basic intrusion detection image recognition algorithm that can trigger alerts and notify you via mobile and email.
You can find more about the project here:
https://github.com/motioneye-project
MotionEye uses the vcgencmd get_camera to detect the Raspberry Pi camera module, because it is set up with Raspberry Pi's legacy camera stack. Conversely, cameras like the Arducam IMX 519 and many others use the new camera driver stack based on libcamera and V4L2.
This post will guide you through how to install the drivers for your new camera, how to test it all works and how to set up an RTMP server to stream your camera feed into MotionEye.
For the rest of this post, I will use a Raspberry Pi Zero 2 W and an Arducam IMX 519 to illustrate the process. It should thus work similarly for any other libcamera camera.
Hardware Setup
You can go ahead and flash the Raspberry Pi SD card with Raspberry Pi OS Bullseye or higher. Make sure you have access through SSH and you preferably VNC ( for testing the camera ).
If you would like to purchase a Raspberry Pi Zero 2 W or the Arducam IMX519, here are some affiliate links:
Raspberry Pi Zero 2 W on amazon.co.uk
If are not sure how to do that, I have created a guide that you can use to get started:
Camera and Driver Setup
You will need to install the appropriate drivers for your camera. Arducam and other manufacturers will provide some quick start guide.
Moreover, Arducam's Quick Start Guide for the IMX519 can be found here:
https://docs.arducam.com/Raspberry-Pi-Camera/Native-camera/Quick-Start-Guide/
Sections 1 to 6 of my guide on setting up an RTSP stream with the Raspberry Pi Zero 2 W and Arducam IMX 519 also apply here:
https://albert-fit.com/how-to-stream-with-raspberry-pi-zero-2-w-and-arducam-imx-519/
The following section covers a condensed version.
Arducam IMX519 Driver
Please enable the device tree overlay for the IMX519 sensor ( replace it with your sensor if you use a different camera ).
Modify /boot/config.txt
sudo nano /boot/config.txt
add dtoverlay=imx519 under the line [all]

#Save and reboot
Download the Bash script
Use wget to download the bash script to install the necessary packages.
wget -O install_pivariety_pkgs.sh https://github.com/ArduCAM/Arducam-Pivariety-V4L2-Driver/releases/download/install_script/install_pivariety_pkgs.sh
Change the script permissions
Add execute permissions to the script.
chmod +x install_pivariety_pkgs.shInstall the kernel driver
Install the kernel driver by calling the script with the -p argument followed by the kernel driver for your camera.
./install_pivariety_pkgs.sh -p imx519_kernel_driver_low_speedlibcamera-dev and libcamera-apps Installation
libcamera provides the underlying support for the camera hardware. It deals with capturing stills or video and the required camera settings. The libcamera library also provides the input for our stream.
./install_pivariety_pkgs.sh -p libcamera
./install_pivariety_pkgs.sh -p libcamera_appsTesting the Camera
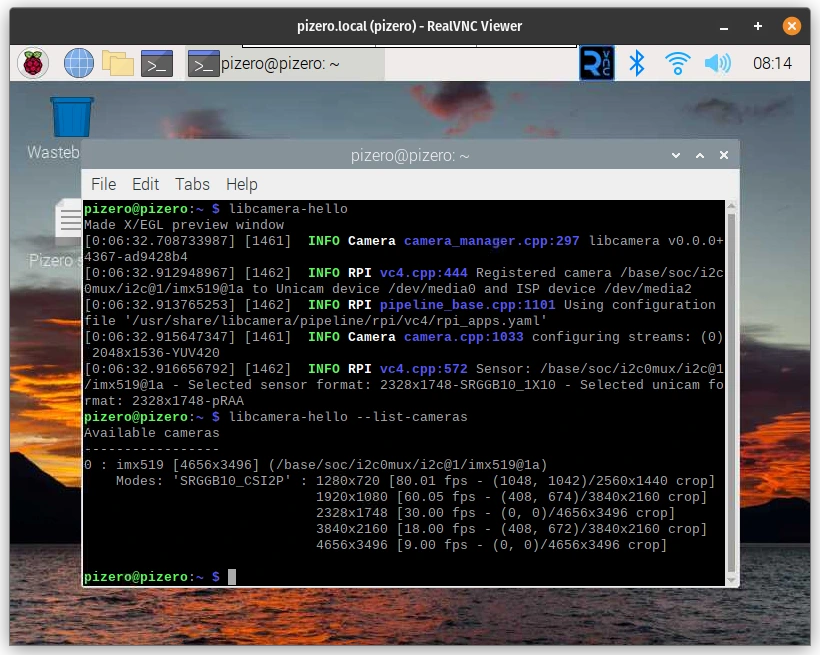
libcamera-hello allows you to test that the camera driver and output work as they should.
libcamera-helloIf you are running libcamera-hello in the terminal, you should see a message similar to the one below. You should also see a camera preview if you have a monitor or VNC window.
pizero@pizero:~ $ libcamera-hello
Preview window unavailable
[0:01:11.971410388] [1085] INFO Camera camera_manager.cpp:297 libcamera v0.0.0+4367-ad9428b4
[0:01:12.114477732] [1087] INFO RPI vc4.cpp:444 Registered camera /base/soc/i2c0mux/i2c@1/imx519@1a to Unicam device /dev/media2 and ISP device /dev/media0
[0:01:12.114666065] [1087] INFO RPI pipeline_base.cpp:1101 Using configuration file '/usr/share/libcamera/pipeline/rpi/vc4/rpi_apps.yaml'
[0:01:12.116348044] [1085] INFO Camera camera.cpp:1033 configuring streams: (0) 2328x1748-YUV420
[0:01:12.117231638] [1087] INFO RPI vc4.cpp:572 Sensor: /base/soc/i2c0mux/i2c@1/imx519@1a - Selected sensor format: 2328x1748-SRGGB10_1X10 - Selected unicam format: 2328x1748-pRAA
#0 (0.00 fps) exp 17750.00 ag 2.00 dg 1.09
#1 (30.00 fps) exp 17750.00 ag 2.00 dg 1.12
#2 (29.99 fps) exp 17750.00 ag 2.00 dg 1.12
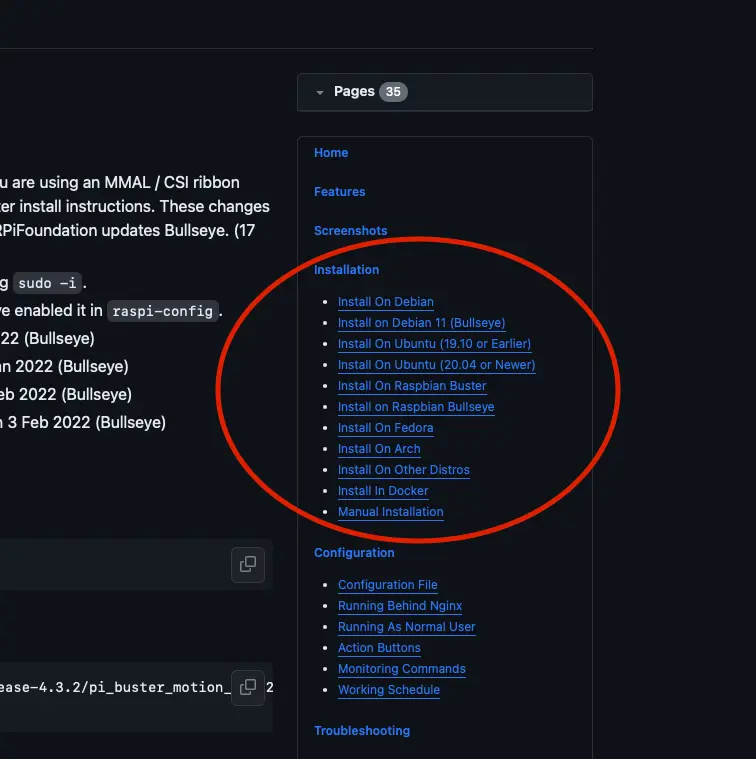
...MotionEye Installation and Configuration
At the time of writing, the most current installation instruction set can be found here:
https://github.com/motioneye-project/motioneye/wiki/Install-on-Raspbian-Bullseye
You would be best served to check the latest installation from the installation section on Github:
Install ffmpeg and other motion dependencies:
Let's instruct the Advanced Package Tool (apt) to locate the motion packages in its repositories, download and install them, and any dependencies they might have.
apt-get install ffmpeg libmariadb3 libpq5 libmicrohttpd12 -yHere, you are instructing the system to install the following dependencies:
ffmpeg
A popular multimedia framework capable of decoding, encoding, transcoding, muxing, demuxing, streaming, filtering, and playing almost any type of media (audio and video).
libmariadb3
A client library for MariaDB, a popular database management system, is a MySQL fork. This library allows applications to interact with a MariaDB database.
libpq5
A library used to enable client applications to communicate with a PostgreSQL database server.
libmicrohttpd12
A small C library that makes it easy to run an HTTP server as part of another application.
As an aside, the -y option automatically answers 'yes' to prompts. By including this, you are telling the system to proceed with the installation without asking for confirmation.
Install motion
Download the motion package with wget and use dpkg to install it (option -i).
 wget https://github.com/Motion-Project/motion/releases/download/release-4.3.2/pi_buster_motion_4.3.2-1_armhf.deb
 dpkg -i pi_buster_motion_4.3.2-1_armhf.deb
Disable the motion service and motionEye control for now:
 systemctl stop motion
 systemctl disable motion
Install the dependencies
MotionEye still uses Python 2 (an older version of Python). Install python2 and python-dev-is-python2. The latter is a transitional package that ensures tools expecting python-dev will work as expected with Python 2.
apt-get install python2 python-dev-is-python2 -yInstall the pip package with pip, the package manager for Python, and save it as get-pip.py.
curl https://bootstrap.pypa.io/pip/2.7/get-pip.py --output get-pip.pyDownload and install the latest version of pip.
python2 get-pip.pyInstall the development libraries
apt-get install libssl-dev libcurl4-openssl-dev libjpeg-dev zlib1g-dev -yThese libraries deal with network communication, data encryption, image processing and data compression.
bssl-dev
This library is part of OpenSSL, an open-source project that provides a robust, commercial-grade, full-featured toolkit for implementing the Secure Sockets Layer (SSL) and Transport Layer Security (TLS) protocols. The libssl-dev package contains the development files necessary for building applications that use OpenSSL for SSL/TLS support. It includes headers and other necessary files for compiling applications that require encryption and secure communication capabilities.
libcurl4-openssl-dev
This package is a development version of the libcurl library, which is used for transferring data with URLs. libcurl supports many protocols like HTTP, HTTPS, FTP, and more. The libcurl4-openssl-dev package includes explicitly development files for libcurl compiled with OpenSSL for SSL/TLS support. This means it's suitable for applications that securely transfer data over networks using these protocols.
libjpeg-dev
The libjpeg-dev package includes development files for the JPEG library, widely used for handling JPEG image data. The JPEG library is mainly known for compressing and compressing JPEG image files. This package is essential for developers working on applications that need to manipulate JPEG images, including operations like reading, writing, or transforming JPEG files.
zlib1g-dev
This package contains the development files for zlib, a widely-used library for data compression. zlib provides functions for compressing and decompressing data using the DEFLATE compression algorithm, which balances speed and compression efficiency. It's commonly utilised in applications requiring data compression and decompression functionalities, such as file archiving tools, network protocols, etc.
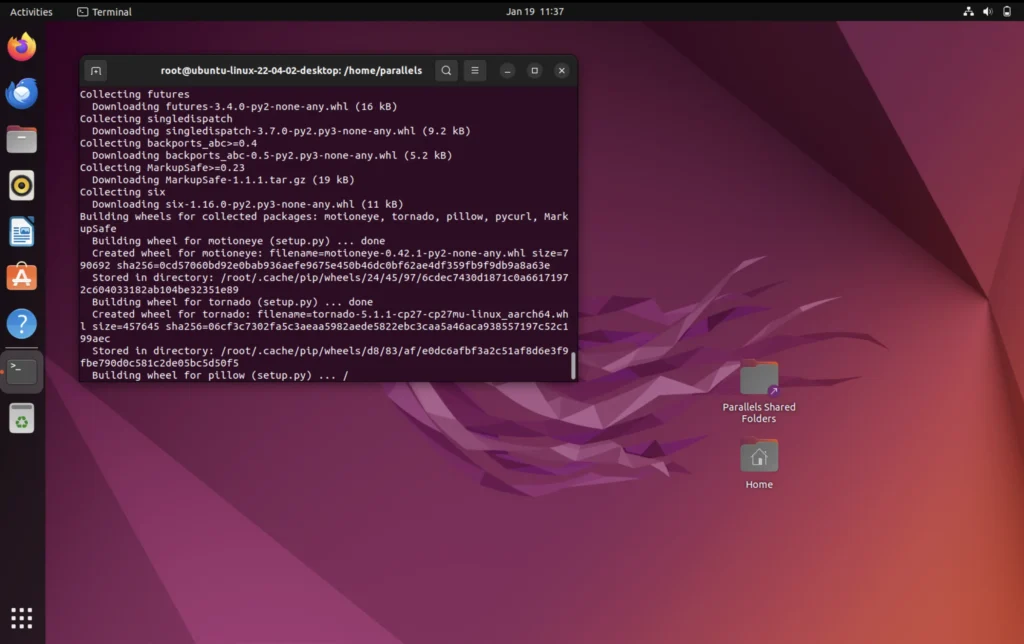
Install motioneye which will automaticall pull Python dependencies (tornado, jinja2, pillow and pycurl)
pip install motioneyenote: If pillow installation fails (hangs and ends at 99%), you can install it from official repos using :
apt-get install python-pil -y
and rerun
pip2 install motioneye.
From web development and template rendering with Tornado and Jina2 to image processing with Pillow and network operations with PyCURL:
tornado
Tornado is a Python web framework and asynchronous networking library. It is particularly well-suited for long polling, WebSockets, and other applications that require a long-lived connection to each user. Tornado is known for its high performance and is often used in applications that need to handle a large number of simultaneous connections. Unlike traditional web frameworks that are typically synchronous and handle one request at a time, Tornado can handle many thousands of connections simultaneously, making it ideal for real-time web services.
jinja2
Jinja2 is a modern and designer-friendly templating language for Python, modelled after Django’s templates. It is fast, widely used and secure with the optional sandboxed template execution environment. Jinja2 creates HTML, XML, or other markup formats that are returned to the user via an HTTP response. It allows Python data structures to be transformed into a text-based format, making it a popular choice for web development, particularly in generating dynamic HTML content.
pillow
The pillow is the friendly PIL (Python Imaging Library) fork. PIL was originally a library for opening, manipulating, and saving many different image file formats. However, PIL is no longer maintained. Pillow was developed as a more user-friendly and maintained version of PIL. It is used for image processing, creation, and manipulation tasks, offering extensive file format support, an efficient internal representation, and fairly powerful image processing capabilities.
pycurl
A Python interface to the libcurl library, a free and easy-to-use client-side URL transfer library. PyCURL allows Python applications to use libcurl's capabilities, such as performing and managing HTTP and HTTPS requests, uploading files via FTP, sending emails using SMTP, and more. PyCURL is known for its performance and ease of use for network programming. It is a popular choice for applications that need to interact with different types of web services or perform network operations.
Prepare the configuration directory:
Make a directory in the /etc/motioneye folder and copy the motioneye.conf.sample as motioneye.conf.
 mkdir -p /etc/motioneye
 cp /usr/local/share/motioneye/extra/motioneye.conf.sample /etc/motioneye/motioneye.conf
Prepare the media directory
create a directory for the media:
mkdir -p /var/lib/motioneyeCreate an init script for the motionEye server and configure it to run at startup
 cp /usr/local/share/motioneye/extra/motioneye.systemd-unit-local /etc/systemd/system/motioneye.service
 systemctl daemon-reload
 systemctl enable motioneye
 systemctl start motioneye
These commands are used to reload the systemd configuration, set the motioneye service to start automatically at boot, and start the motioneye service immediately:
daemon-reload
Reload the systemd manager configuration. This reloads all unit files and recreates the entire dependency tree. It's often necessary to run this command after making changes to a service file (for example, a file in /etc/systemd/system/) to ensure systemd is aware of the changes. The command does not restart any services or units but reloads the configuration files.
enable motioneye
Enable a service named motioneye. Enabling a service means that it will be started automatically at boot time. This is different from starting a service, which runs it once. By enabling motioneye, you're ensuring that the service will start every time the system boots up. The motioneye service is likely related to the MotionEye software, a web frontend for the motion daemon monitoring and controlling camera feeds.
start motioneye
Starts the motioneye service immediately. Unlike the enable command, start doesn't configure the service to start at boot but simply starts it right now. This is useful for initiating services that don't need to run constantly or for testing purposes after configuring or troubleshooting a service.
To upgrade to the newest version of motionEye:
 pip install motioneye --upgrade
 systemctl restart motioneye
Testing MotionEye
You can test motion eye by entering the following URL string into your browser:
http://[hostname or ip]:8765
In my case this look something like this:
http://pizero.local:8765
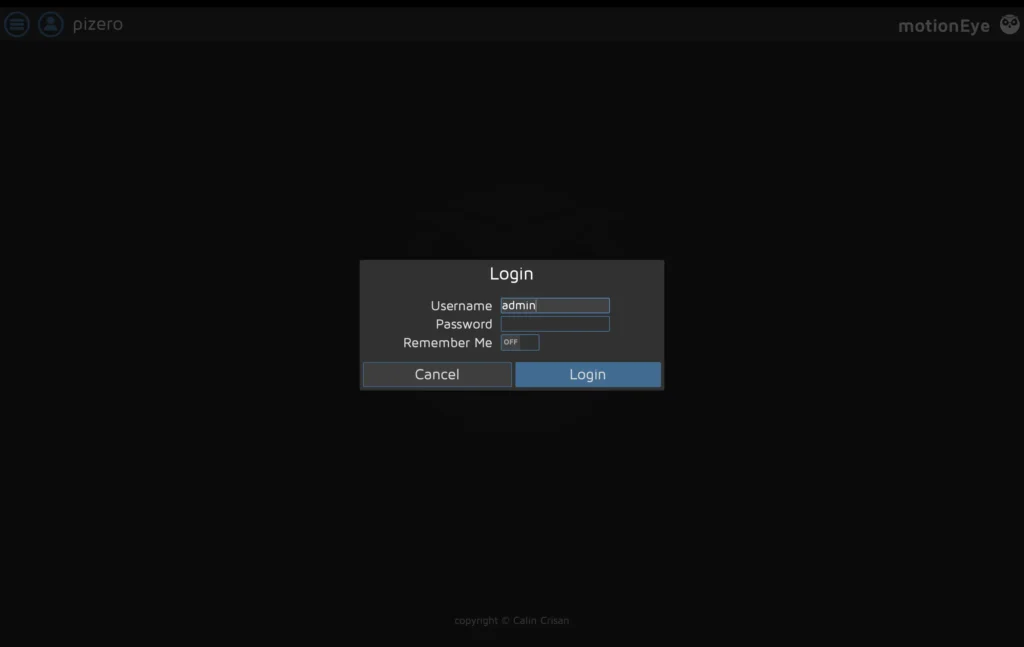
The default username is admin, and there is no password. It is recommended you change the username and password as soon as possible.
RTMP Stream Setup
Create a new bash script called stream.sh.
sudo nano stream.shPaste the following script:
#!/bin/bash
libcamera-vid -t 0 --width 1920 --height 1080 --nopreview --exposure long \
 --sharpness 1.2 --contrast 1.4 --brightness 0.2 --saturation 1.0 --awb auto --denoise auto \
--rotation 0 --codec libav --libav-format flv -n --framerate 30 -b 3200000 --autofocus-mode auto \
 --inline -o "rtmp://127.0.0.1/pi/test"
This libcamera-vid command is used to capture the video with your Raspberry Pi. We then take and output the video to the RTMP (Real-Time Messaging Protocol) server.
-t 0
Runs the camera indefinitely (0 milliseconds).
--width 1920 --height 1080
Sets the video resolution to 1920x1080 pixels.
--nopreview
Disables the preview window.
--exposure long
Sets a longer exposure time.
--sharpness 1.2 --contrast 1.4 --brightness 0.2 --saturation 1.0
Adjusts image sharpness, contrast, brightness, and saturation.
--awb auto
Sets the automatic white balance mode.
--denoise auto
Enables automatic noise reduction.
--rotation 0
Sets the image rotation to 0 degrees.
--codec libav
Specifies the libav codec for encoding the video.
--libav-format flv
Sets the format of the video to FLV (Flash Video).
-n
Disables the display of preview window information.
--framerate 30
Captures video at 30 frames per second.
-b 3200000
Sets the bitrate to 3,200,000 bits per second.
--autofocus-mode auto
Enables automatic focusing.
--inline
Includes inline headers in the video stream (useful for streaming).
-o "rtmp://127.0.0.1/pi/test"
Outputs the video to the specified RTMP (Real-Time Messaging Protocol) server URL.
Enabling the Streaming Script as a Service
Setting the permissions for the streaming script
Now you have to enable the script file to be executed:
Note: Replace pizero with your pi username.
sudo chmod +x /home/pizero/stream.shEnabling stream.service
sudo nano /lib/systemd/system/stream.servicePaste the following in it (keeping in mind that pizero is the user in /home/pizero/stream.sh and you will need to replace with your own user):
[Unit]
Description=Custom Webcam Streaming Service
After=multi-user.target

[Service]
Type=simple
ExecStart=/home/pizero/stream.sh
Restart=on-abort

[Install]
WantedBy=multi-user.target
Set the correct permissions on the service file:
sudo chmod 644 /lib/systemd/system/stream.serviceThis permission setting (644) is commonly used for configuration files and scripts that should not be executed but must be readable and editable by the owner.
644: This is the numeric mode, which represents the new permissions for the file. In Unix-like systems, file permissions are represented by three sets of digits. The first digit represents the user's permissions, the second digit represents the group's permissions, and the third digit represents others' permissions.
- The digit
6(which stands forrw-in symbolic notation) grants the user (owner) read and write permissions but not execute permission. - The digit
4(which stands forr--) grants read-only permission. This is applied to both the group and others.
Create the service on the system
sudo systemctl enable stream.serviceBy running sudo systemctl enable stream.service, you are instructing systemd to create the necessary links and configurations to start the stream.service automatically whenever the system boots up. This is particularly useful for background services or daemons running whenever the system is operational, such as making sure your rtsp server spins up as soon as the Raspberry Pi Zero 2 W boots up.
Start the service.
sudo service stream startRunning sudo service stream start, you are instructing the system to start the stream service. This is typically used to activate daemons or background services that need to run continuously or are required for the functioning of other parts of the system.
It's important to note that in systems that use systemd (which has become the default in many modern Linux distributions), the systemctl command is generally used instead of service. However, the service command is still present for compatibility reasons and is often a wrapper around systemctl in such systems.
Check the status of the service
sudo service stream statusInstall NGINX
Install NGINX on your Raspberry Pi, the basic set of modules required to run it as a web server, and the RTMP module for handling media streaming.
sudo apt install nginx-common nginx-core libnginx-mod-rtmp nginx-common
This package contains standard files for all NGINX packages, such as configuration files and documentation. It depends on other NGINX packages and is usually installed alongside them.
nginx-core
This package provides the core NGINX files. It includes the NGINX binary and essential modules required to run NGINX as a web server and reverse proxy. This is the main NGINX package you'd install to set up an NGINX server.
libnginx-mod-rtmp
This package is a module for NGINX that enables RTMP (Real-Time Messaging Protocol) support. RTMP is a protocol commonly used for streaming audio, video, and other data over the internet, especially in applications like live broadcasting. NGINX can handle RTMP streams by installing this module, making it suitable for media streaming applications.
NGINX RTMP Configuration
You can go ahead and open the nginx.conf with nano.
nano /etc/nginx/nginx.confPaste the following at the end of the file and save it:
rtmp {
        server {
                listen 1935;
                chunk_size 4096;
                allow publish 127.0.0.1;
                deny publish all;

                application pi {
                        live on;
                        record off;
                }
        }
}
This configuration sets up NGINX to handle RTMP streams, allowing live streaming. Here's how it works:
rtmp {
This line begins the configuration block for the RTMP module.
server {
Defines a server block within the RTMP context. This is similar to server blocks in the HTTP context but for RTMP streams.
listen 1935;
This directive tells the RTMP server to listen on port 1935, the default port for RTMP.
chunk_size 4096;
Sets the RTMP chunk size to 4096 bytes. This is the size of the data chunks in which the stream is divided.
allow publish 127.0.0.1;
Allows only the localhost (127.0.0.1) to publish streams to this server.
deny publish all;
Denies all other IPs from publishing streams to this server. Combined with the previous directive, this restricts publishing to the local machine only.
application pi {
Starts a configuration block for an application named "pi". This is a specific context for RTMP streaming.
live on;
Enables live streaming for this application.
Restart NGINX
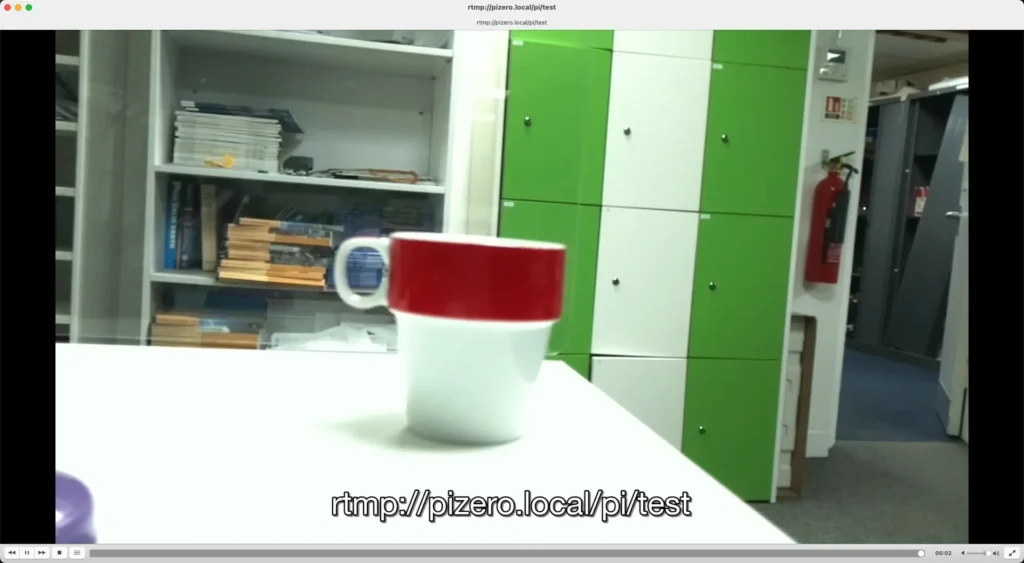
sudo service nginx restartTesting the RTMP Stream
You can use VLC to test your RTMP Stream by navigating to File -> Open Network (ctrl + N) and entering the following connection string:
rtmp://[YOUR_HOSTNAME]/pi/test
In my case, it is:
rtmp://pizero.local/pi/test
Linking the stream in MotionEye
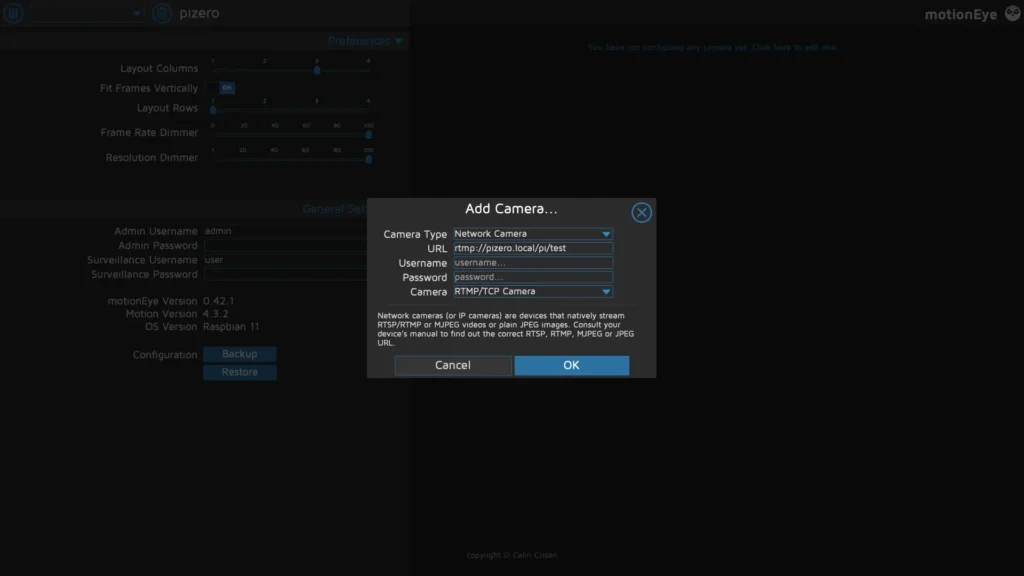
You can now return to your MotionEye interface (https://[YOUR_HOSTNAME]:8765) and add a new camera.
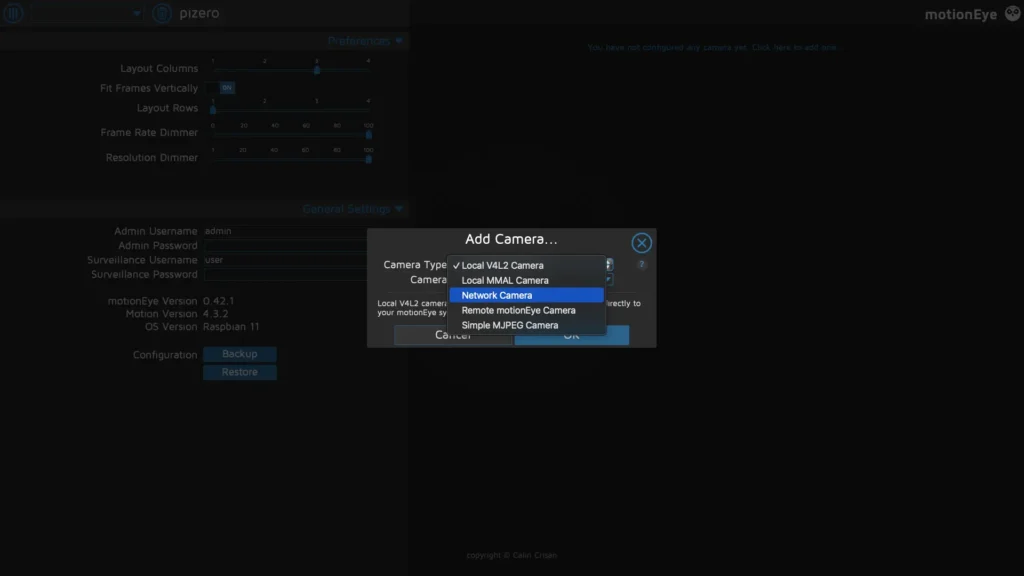
Select Network Camera under Camera Type and add the RTMP URL as you set it up in the stream bash script.
This should work with:
rtmp://[YOUR_HOSTNAME]/pi/test
or
rtmp://127.0.0.1/pi/test
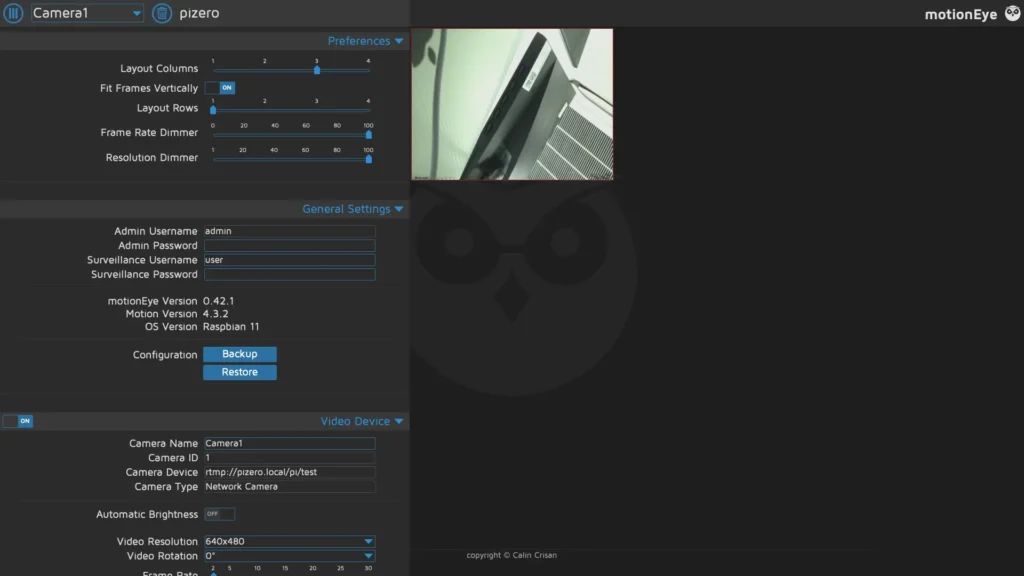
You can, of course, change this configuration later on.
Your camera will take some time to register ( RTMP does have a significant delay).
Performance Optimisation
Running MotionEye on a Raspberry PI Zero 2 W with the RTMP server as a feed produces mediocre, if not poor, results.
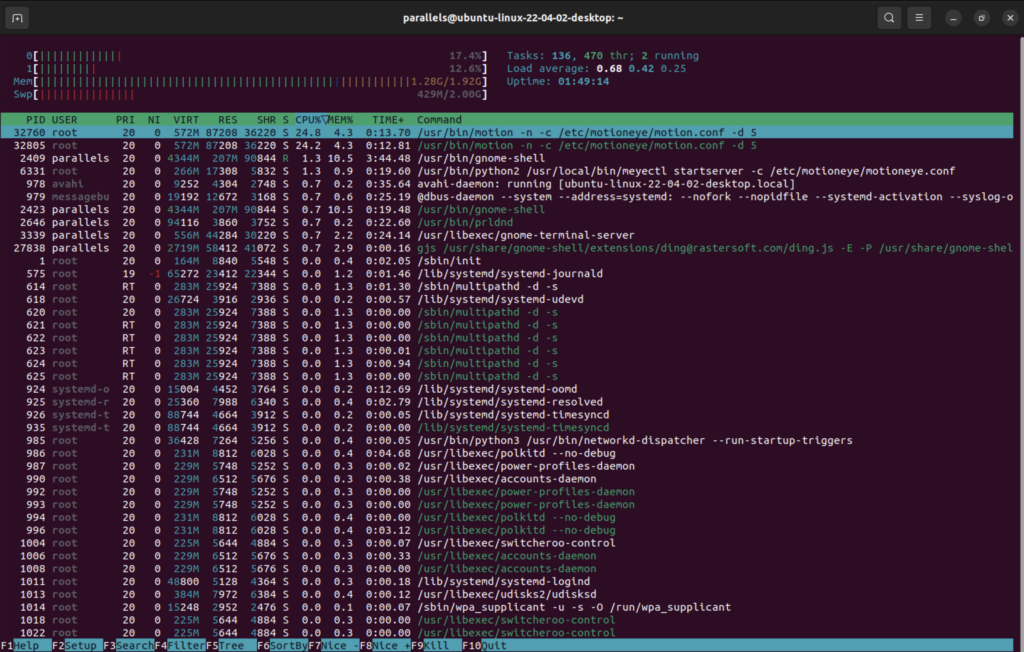
You can run htop in an SSH window to view the CPU load on your Raspberry Pi. In this case, we can see that MotionEye maxes out the CPU, which is also apparent from the drop in frame rate and delay in the footage.
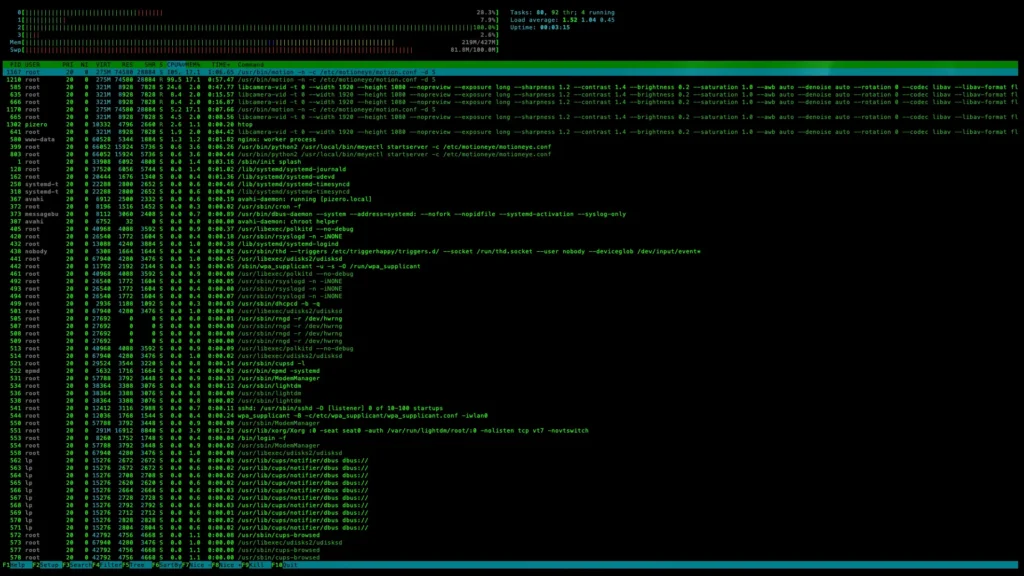
You can also stop the motion eye service by running:
sudo service motioneye stop
htop
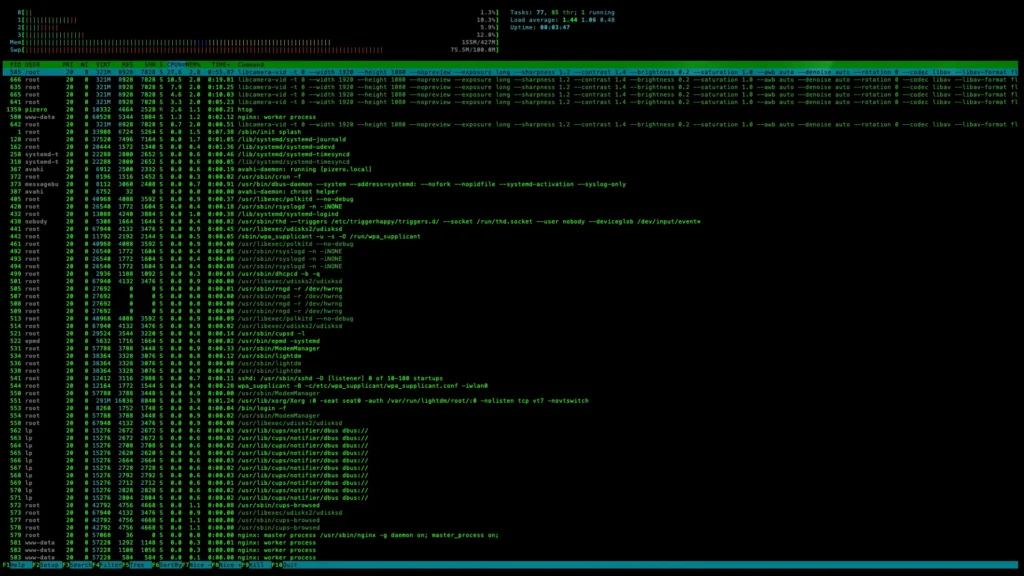
#to view resourecesWe can now observe that the resources taken up by the RTMP stream are significantly lower than the stream along with MotionEye.
MotionEye on a separate machine
We can also test how MotionEye works with the RTMP feed through a virtual machine's Ubuntu 22.04.2 LTS installation. You can install a different distribution in a virtual machine or 'bare metal' on a Raspberry Pi or your server computer.
I have followed the MotionEye installation guide, which you can find here:
https://github.com/motioneye-project/motioneye/wiki/%28Install-On-Ubuntu-%2820.04-or-Newer%29
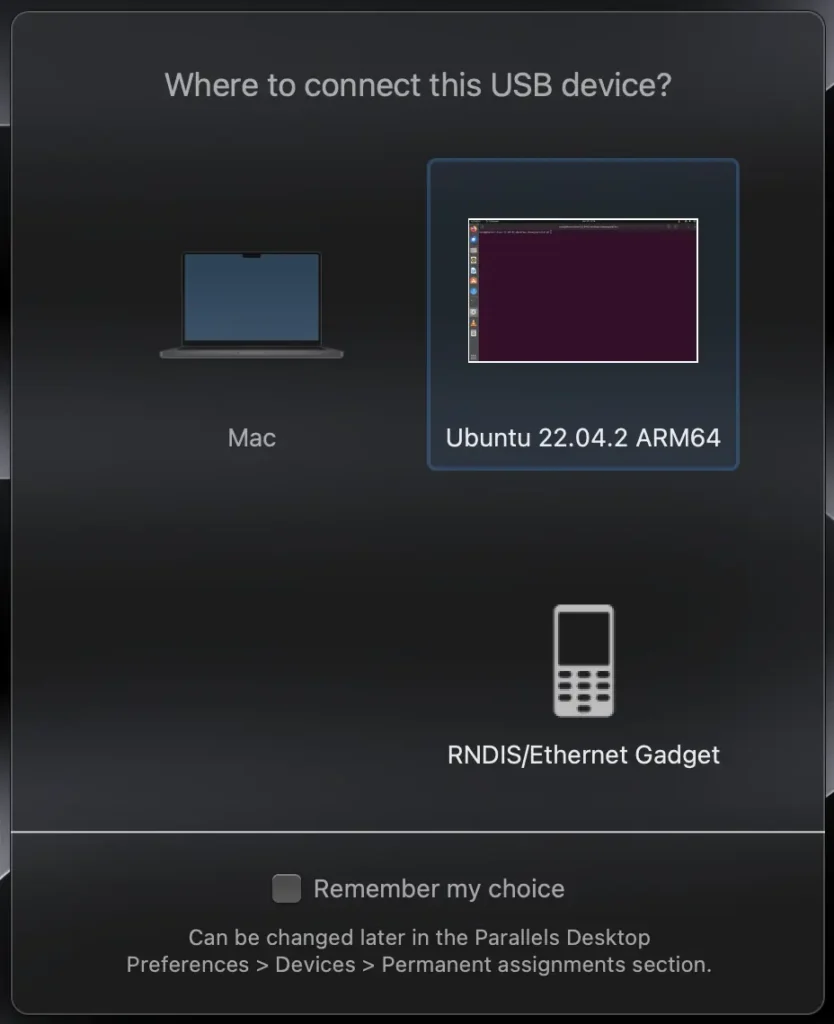
Notes for testing in USB OTG and Virtual Machine
These notes only apply if you plan on testing the connection with USB OTG.
I am using Parallels, and when you connect your Raspberry Pi, you should get a similar message. Forward the RNDIS/Ethernet Gadget to your virtual machine.
If you are using Virtual Box, you can find some instructions here:
https://www.flexihub.com/usb-in-virtual-machine/virtualbox-usb-passthrough/
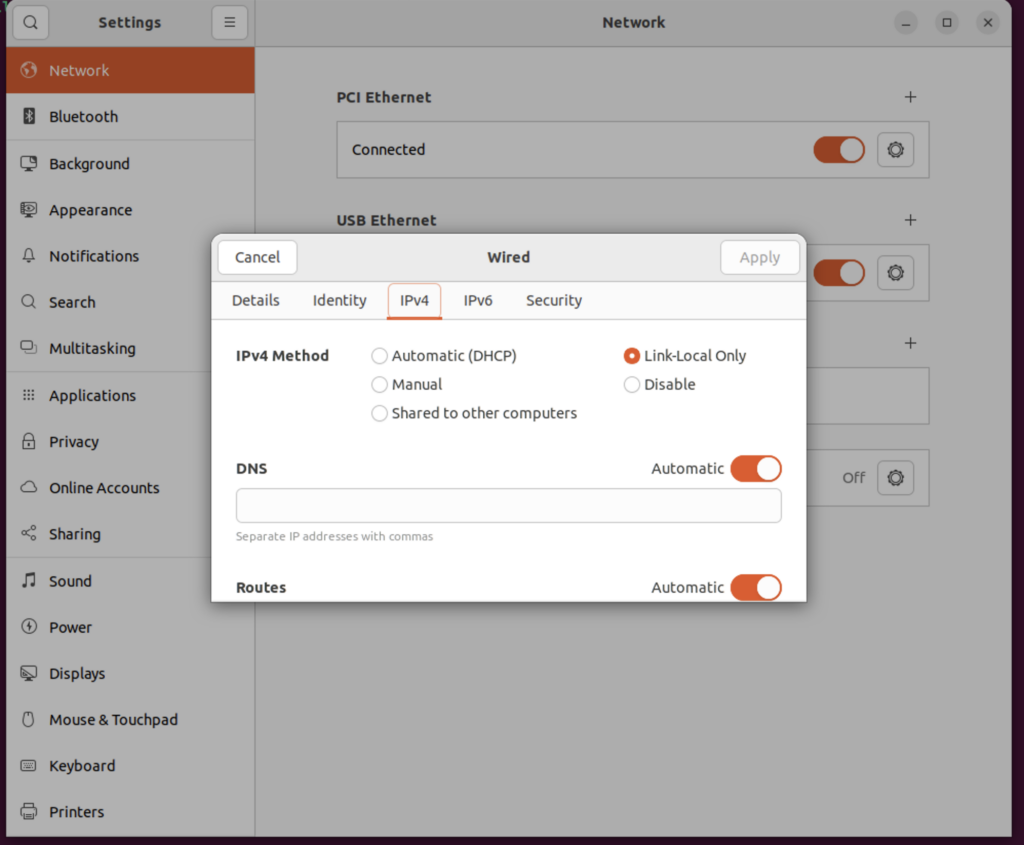
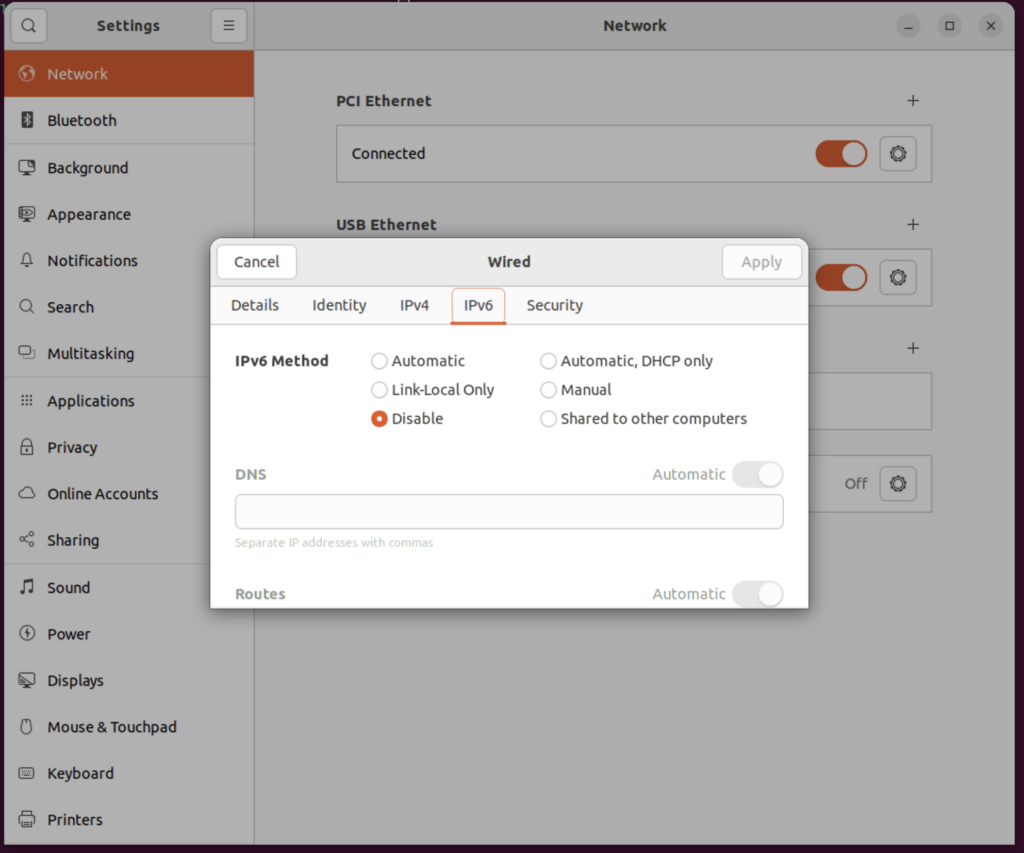
If you are using USB OTG you need to set:
IPV4 to Link-Local Only
IPV6 to Disable
Your USB Ethernet connection should now list as connected. You can test it by pinging your hostname:
ping [YOUR_HOSTNAME].local

#in my case: ping pizero.local
MotionEye on Server Machine
Add the RTMP connection to the MotionEye server in the virtual machine.

You will see an ability to run much higher frame rates with lower latency.
You can also recheck your resourcing by running htop.
Conclusion
In conclusion, setting up a Raspberry Pi with a camera like the Arducam IMX 519 for use with MotionEye as a discreet CCTV system with motion detection can be a rewarding DIY project. This guide has walked you through the steps, from flashing the SD card with the appropriate OS, installing the required drivers for your camera, and configuring both the camera and MotionEye software. The detailed steps included testing the camera, setting up an RTMP server, and configuring NGINX to handle the RTMP streams, ensuring a smooth and efficient setup process.
You now have a functional and customisable CCTV system by overcoming the initial hurdle of camera detection and compatibility issues with MotionEye. Whether you're using it on a Raspberry Pi Zero 2 W or another setup, the flexibility and scalability of this system are evident. Additionally, you can optimise performance and frame rates with lower latency by exploring alternative setups like running MotionEye on a separate machine or using a virtual machine to achieve a higher grade stream.
Remember that DIY projects like this provide a practical solution to your security needs and offer a great opportunity to learn and experiment with technology. Whether you're a seasoned maker or a curious beginner, the journey of setting up your own Raspberry Pi-based CCTV system with MotionEye is both educational and rewarding.
Introduction
This tutorial covers installing and using the Arducam IMX 519 16 mp camera along with the Raspberry Pi Zero 2 W.
Please note that the tutorial will require specific hardware. Kindly ensure that you have the necessary components to complete the tutorial successfully.
- A Raspberry Pi Zero 2 W;
- An Arducam IMX519 camera; and
- A host machine.
If you would like to purchase a Raspberry Pi Zero 2 W or the Arducam IMX519, here are some affiliate links:
Raspberry Pi Zero 2 W on amazon.co.uk
To follow along, it's important to make sure that you have Raspbian Bullseye with a headless install set up on your Raspberry Pi. To get started, you can take a look at the following guide
https://albert-fit.com/how-to-set-up-raspberry-pi-zero-2-w-headless-mode/
Arducam IMX 519 Driver
The first step is to download the bash scripts required for installing the IMX519 driver.
Modify /boot/config.txt
sudo nano /boot/config.txt
add dtoverlay=imx519 under the line [all]

#Save and reboot
To clarify, modifying the line dtoverlay=imx519 in the /boot/config.txt file on a Linux system enables and configures a specific device tree overlay, such as the imx519 sensor.
Here's a breakdown of what this means:
- Device Tree Overlays (DTO): A device tree is a data structure that describes the hardware components of a particular computer so that the operating system's kernel can use and manage those components. Overlays are additional information that can be dynamically loaded to modify the device tree at boot time. This is particularly useful in systems like the Raspberry Pi, where the exact hardware configuration might not be known beforehand.
- IMX519: This is likely a reference to a specific hardware component, specifically the image sensor. The IMX519 is a model of an image sensor made by Sony, commonly used in cameras and mobile devices for capturing images, as well as the Arducam 16mp camera.. By specifying
dtoverlay=imx519, the configuration instructs the operating system to load the device tree overlay for this specific sensor. This ensures the kernel has the correct information to interact with and control the IMX519 sensor.
Download the Bash script
wget -O install_pivariety_pkgs.sh https://github.com/ArduCAM/Arducam-Pivariety-V4L2-Driver/releases/download/install_script/install_pivariety_pkgs.sh
Here's a breakdown of each part of the command:
wget: This is a free utility for non-interactive downloading of files from the web. It supports HTTP, HTTPS, and FTP protocols, as well as retrieval through HTTP proxies.-O install_pivariety_pkgs.sh: The-Ooption inwgetallows you to specify the name of the file where the downloaded content will be saved. In this case, the content downloaded from the given URL will be saved to a file namedinstall_pivariety_pkgs.shon your local system. If you don't use the-Ooption,wgetwill use the filename in the URL by default.https://github.com/ArduCAM/Arducam-Pivariety-V4L2-Driver/releases/download/install_script/install_pivariety_pkgs.sh: This is the URL of the file you want to download. In this case, it's a shell script hosted on GitHub, designed explicitly for installing Arducam Pivariety V4L2 Driver.
When you run this command, wget will connect to the GitHub server and download the install_pivariety_pkgs.sh script, save it to a file with the same name in your current directory.
Change the script permissions
chmod +x install_pivariety_pkgs.shThe command chmod +x install_pivariety_pkgs.sh is used to change the file permissions of the script install_pivariety_pkgs.sh. Let's break down this command:
chmod: This is a Unix command used to change the permissions of a file or directory. Permissions dictate who can read, write, or execute the file or directory.+x: This part of the command is an argument tochmodthat specifies the change to be made to the file's permissions. The+xmeans "add execute permission." In Unix-like operating systems, a file must have execute permission to be run as a program.install_pivariety_pkgs.sh: This is the file name whose permissions you are changing. In this case, it's the script that you previously downloaded usingwget.
By running chmod +x install_pivariety_pkgs.sh, you are adding execute permissions to the install_pivariety_pkgs.sh script. This means that after running this command, you (and other users with appropriate permissions) can run this script as a program on your system. This step is often necessary for scripts downloaded from the internet, as they typically do not have execute permissions set by default for security reasons.
Install the kernel driver
./install_pivariety_pkgs.sh -p imx519_kernel_driver_low_speedThe command ./install_pivariety_pkgs.sh -p imx519_kernel_driver_low_speed executes a script with specific arguments. Let's break down this command:
./install_pivariety_pkgs.sh:.: This represents the current directory in Unix-like operating systems./: This is the directory separator.install_pivariety_pkgs.sh: This is the name of the script you want to execute.
./before the script name indicates that it is in the current directory and you want to execute it. This is necessary because, in most Unix-like systems, the current directory is not in the PATH by default for security reasons. Thus, to run a script from the current directory, you need to specify the path explicitly, and./is the way to do that.-p imx519_kernel_driver_low_speed:-p: This is an argument that the scriptinstall_pivariety_pkgs.shis designed to accept. The meaning of-pis specific to the script itself. The help function lists -p as "Specify Package Name".imx519_kernel_driver_low_speed: This appears to be another argument to the script, likely specifying a particular package or module to be installed or configured. In this context, it seems to refer to a lower-speed version of the kernel driver for the IMX519 camera sensor.
When you run this command, the script install_pivariety_pkgs.sh is executed, and it receives -p imx519_kernel_driver_low_speed as its argument. This triggers the installation of the low-speed kernel driver for the IMX519 sensor.
libcamera-dev and libcamera-apps Installation
./install_pivariety_pkgs.sh -p libcamera
./install_pivariety_pkgs.sh -p libcamera_appslibcamera and libcamera-apps are particularly relevant when using Arducam cameras on the Raspberry Pi because libcamera provides the underlying support for camera hardware. In contrast, libcamera-apps offers practical examples of how to use the library in real-world applications.
- bcamera:
- Purpose:
libcamerais a complex, cross-platform camera support library designed for embedded and mobile devices. It aims to provide a modern and easy-to-use API for camera hardware control. - Features: The library abstracts the details of controlling different types of camera hardware, providing a unified interface for application developers. It supports a range of camera operations and features, including complex image processing and camera control algorithms.
- Cross-platform Compatibility:
libcamerais designed to work across different operating systems and hardware platforms, making it a versatile choice for camera applications in diverse environments. - Use Cases: It is particularly useful in systems where direct control of camera hardware is needed, such as in smartphones, tablets, and embedded devices like the Raspberry Pi.
- Purpose:
- libcamera-apps:
- Purpose:
libcamera-appsare applications or tools built on top of thelibcameralibrary. They serve as examples or utilities for usinglibcamera. - Functionality: These apps typically demonstrate how to perform common camera operations like capturing still images, recording video, or applying image processing techniques using
libcamera. - Examples: Common examples of
libcamera-appsmight include a basic camera app, a video recording tool, or a streaming application. - Developer Utility:
libcamera-appscan be helpful for developers as reference implementations or starting points for building their own camera-based applications.
- Purpose:
Testing the camera
Open up Real VNC (or similar) and connect to the remote desktop.
Alternatively, plug in a monitor to the mini HDMI port.
This shows if you have correctly installed the camera to the PI.
libcamera-hello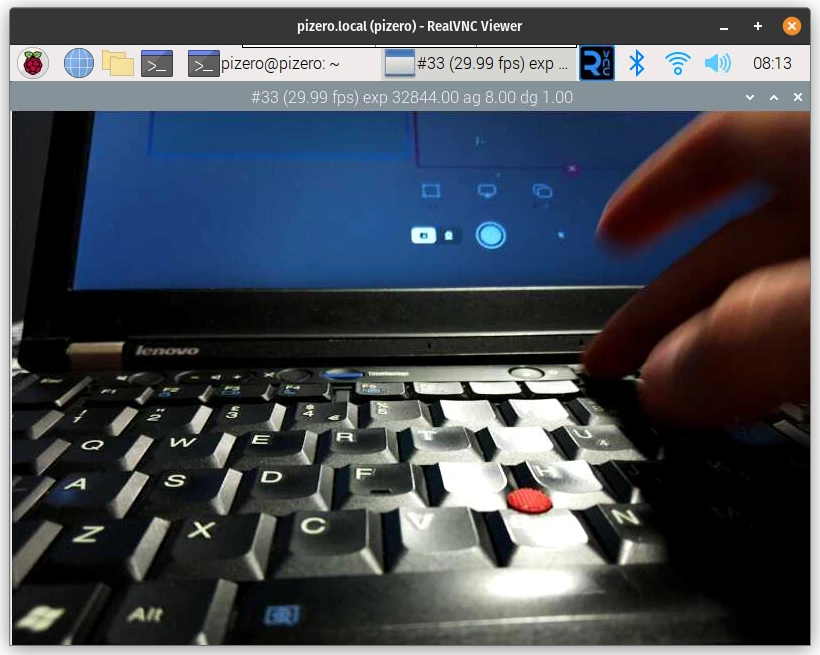
You can also try to take a still image and a video which will be saved in ~.
libcamera-still -t 0 --autofocus-mode auto -o test.jpg

libcamera-vid -t 10000 -o test.h264
Installing VLC
Installing VLC can take a while.
sudo apt install -y vlcAllow VLC to be run as root. This is needed for the streaming to start.
sudo sed -i 's/geteuid/getppid/' /usr/bin/vlcDetecting your camera
You can list your camera with libcamera-hello, which will allow you to detect the optimal resolution.
libcamera-hello --list-camerasThe output code should look similar to the following snippet.
Creating a streaming script
You can use nano to create the stream.sh file.
sudo nano ~/stream.shThe following are the contents for the stream.sh file.
You might want to experiment with the resolution, frame rate and other parameters.
--vflip and/or --hflip are used for correcting the view.
You can also set up authentication. Replace the username and password with your preferred credentials.
#!/bin/bash
libcamera-vid -t 0 --inline --width 1920 --height 1080 --framerate 15 -o - | cvlc -vvv stream:///dev/stdin --sout '#rtp{sdp=rtsp://:8554/stream}' :demux=h264 --sout-rtsp-user=username --sout-rtsp-pwd=password
Breaking down the streaming script
This command is a Bash script that combines two commands to capture video from a camera and stream it over RTSP (Real-Time Streaming Protocol) with VLC media player. Let's break down each part:
#!/bin/bash: This is the shebang line that tells the system to execute this script with the Bash shell.libcamera-vid -t 0 --inline --width 1920 --height 1080 --framerate 15 -o -:libcamera-vid: A command-line tool to capture video from a camera, typically used with Raspberry Pi cameras.-t 0: Sets the timeout to 0 seconds, meaning the capture will continue indefinitely.--inline: Enables inline headers for H.264 encoding.--width 1920 --height 1080: Sets the video resolution to 1920x1080 pixels.--framerate 15: Sets the video frame rate to 15 frames per second.-o -: Specifies the output to standard output (stdout).
|: This pipe symbol takes the output of thelibcamera-vidcommand and uses it as the input for the next command.cvlc -vvv stream:///dev/stdin:cvlc: The command-line interface for VLC media player.-vvv: Increases the verbosity level to provide more detailed logging.stream:///dev/stdin: Tells VLC to read the video stream from standard input (stdin), which is the output fromlibcamera-vid.
--sout '#rtp{sdp=rtsp://:8554/stream}':--sout: Specifies the streaming output chain for VLC.#rtp{sdp=rtsp://:8554/stream}: Configures VLC to use RTP (Real-Time Protocol) and sets up an SDP (Session Description Protocol) announcement for RTSP at port 8554 with the path/stream.
:demux=h264::demux=h264: Specifies that the input stream is in H.264 format.
--sout-rtsp-user=username --sout-rtsp-pwd=password:--sout-rtsp-userand--sout-rtsp-pwd: These options set the username and password for the RTSP stream, providing basic authentication.
In summary, this script captures video from a camera using libcamera-vid, encodes it in H.264 format, and streams it over an RTSP server using VLC, with access controlled by a username and password.
Security Recommendations
Note that while this method adds a basic level of security, it's essential to consider additional security measures, especially if the stream is sensitive or needs to be highly secure.
Securing RTSP (Real-Time Streaming Protocol) streams is important to prevent unauthorised access and ensure the privacy and integrity of the video data. Here are some recommendations for enhancing security over RTSP:
Internal security
- Use Strong Authentication: Implement strong username and password authentication for RTSP streams. Avoid using default or easily guessable credentials. Regularly update the credentials and use a robust authentication mechanism.
- Implement Transport Layer Security (TLS): Use TLS to encrypt the RTSP stream. TLS provides a secure communication channel by encrypting the data transmitted between the server and the client, thus protecting against eavesdropping and man-in-the-middle attacks.
- Use Secure Real-Time Transport Protocol (SRTP): SRTP is an extension of RTP (Real-Time Protocol) that provides encryption, message authentication, and integrity for media streams. It ensures that the content of the video stream is secure and has not been tampered with.
Network Security
- Network Segmentation: Place your streaming devices on a separate network segment or VLAN to isolate them from other parts of the network. This reduces the risk of unauthorized access from other devices on the network.
- Firewall and Access Control: Configure firewalls to restrict access to the RTSP stream. Allow access only from trusted IP addresses or networks. Implement access control lists to define who can access the stream.
- Regular Updates and Patching: Keep your streaming software, firmware, and any associated components up to date with the latest security patches and updates. This helps protect against known vulnerabilities.
- Monitor and Log Access: Keep logs of access to the RTSP stream and monitor them for any unusual or unauthorised activity. This can help in identifying and responding to security incidents.
- VPN for Remote Access: If you need to access the RTSP stream remotely, consider using a Virtual Private Network (VPN). A VPN provides a secure tunnel over the internet and can prevent unauthorized access to the stream.
- Disable Unused Services and Features: Turn off any services or features of the streaming device or software that are not being used. This reduces the attack surface and potential vulnerabilities.
- Physical Security: Ensure that the physical security of the streaming devices is robust. This includes securing access to the devices themselves and the locations they are monitoring.
Enabling the Streaming Script as a Service
Setting the permissions for the streaming script
Now you have to enable the script file to be executed:
Note: Replace pizero with your pi username.
sudo chmod +x /home/pizero/stream.shEnabling stream.service
sudo nano /lib/systemd/system/stream.servicePaste the following in it (keeping in mind that pizero is the user in /home/pizero/stream.sh and you will need to replace with your own user):
[Unit]
Description=Custom Webcam Streaming Service
After=multi-user.target

[Service]
Type=simple
ExecStart=/home/pizero/stream.sh
Restart=on-abort

[Install]
WantedBy=multi-user.target
Set the correct permissions on the service file:
sudo chmod 644 /lib/systemd/system/stream.serviceThis permission setting (644) is commonly used for configuration files and scripts that should not be executed but must be readable and editable by the owner.
644: This is the numeric mode, which represents the new permissions for the file. In Unix-like systems, file permissions are represented by three sets of digits. The first digit represents the user's permissions, the second digit represents the group's permissions, and the third digit represents others' permissions.
- The digit
6(which stands forrw-in symbolic notation) grants the user (owner) read and write permissions but not execute permission. - The digit
4(which stands forr--) grants read-only permission. This is applied to both the group and others.
Create the service on the system
sudo systemctl enable stream.serviceBy running sudo systemctl enable stream.service, you are instructing systemd to create the necessary links and configurations to start the stream.service automatically whenever the system boots up. This is particularly useful for background services or daemons running whenever the system is operational, such as making sure your rtsp server spins up as soon as the Raspberry Pi Zero 2 W boots up.
Start the service.
sudo service stream startRunning sudo service stream start, you are instructing the system to start the stream service. This is typically used to activate daemons or background services that need to run continuously or are required for the functioning of other parts of the system.
It's important to note that in systems that use systemd (which has become the default in many modern Linux distributions), the systemctl command is generally used instead of service. However, the service command is still present for compatibility reasons and is often a wrapper around systemctl in such systems.
Check the status of the service
sudo service stream status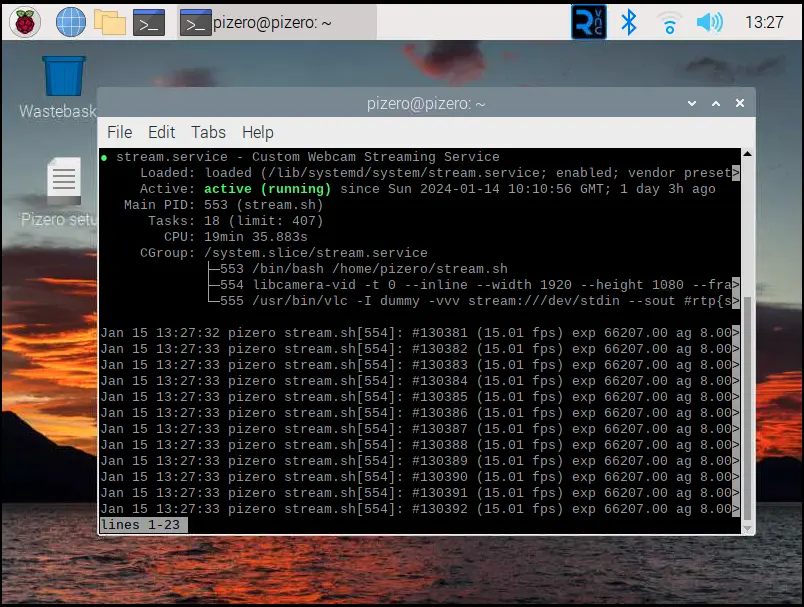
You are good to go as long as Active displays as active (running).
Checking the streaming on your desktop
Start VLC media player and navigate to Media -> Open Network Stream (or press CTRL + N).
Enter URL as follows:
rtsp://pizero.local:8554/stream
Replace pizero with your specific hostname.
At this point, VLC will ask you for the username and password you set up.
Conclusion and References
Congratulations! You have now set up your Raspberry Cam Zero 2 W with the Arducam IMX519 to broadcast over RTSP.
You can check out more detail on the setup at the following links:
Arducam IMX519 Quick Start Guide
Introduction
This guide is aimed at helping you set up the Raspberry Pi Zero 2 W in "headless mode". Headless mode connects to the Raspberry Pi command line or desktop environment without attaching a screen, keyboard, or mouse. Connect the Raspberry Pi to your main machine via WiFi or USB OTG, and you can use SSH to dial in. The guide has specific sections for Windows, Mac, and Linux.
If you would like to purchase a Raspberry Pi Zero 2 W or the Arducam IMX519, here are some affiliate links:
Raspberry Pi Zero 2 W on amazon.co.uk
Flashing the Raspberry Pi Zero 2 W Firmware
Have an SD card ready and plug it into your machine's SD card reader.
Note: Flashing works best with the internal SD Card reader because the card will have multiple partitions.
Download and install the Raspberry Pi Imager. You can get the utility from the downloads page:
https://www.raspberrypi.com/software/
If you are on linux:
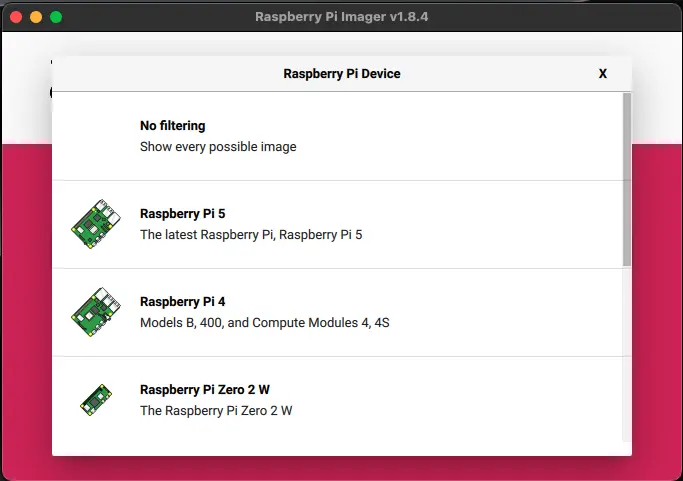
sudo apt install rpi-imagerGo ahead and select Raspberry Pi Zero 2 W from the Device Section.
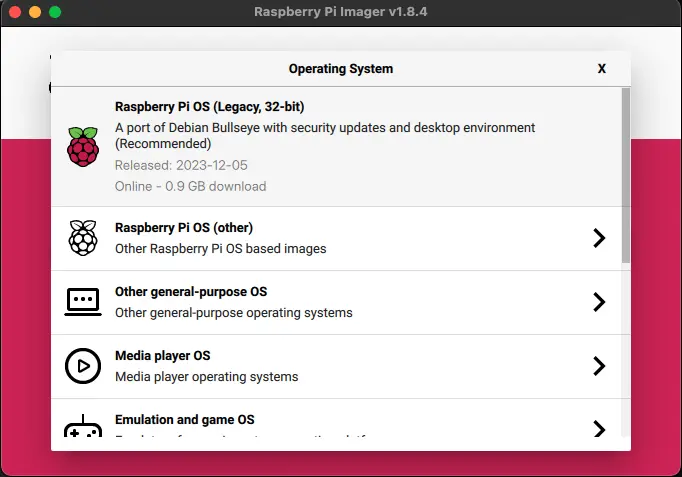
Select the Raspberry Pi Os (Legacy, 32-bit), a Debian Bullseye port. Select the SD card you inserted and click next.
EDIT SETTINGS to apply OS customisation settings.

It would be best if you considered giving each hostname a unique name.
Set up your username and password.
Include your Wifi SSID (name) and password.
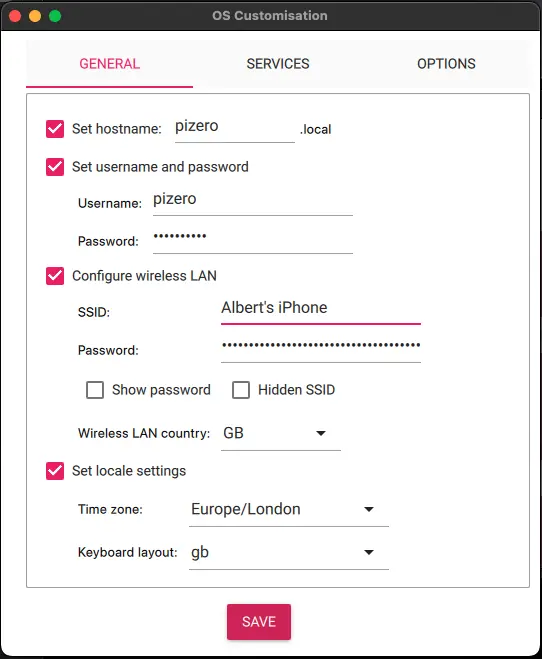
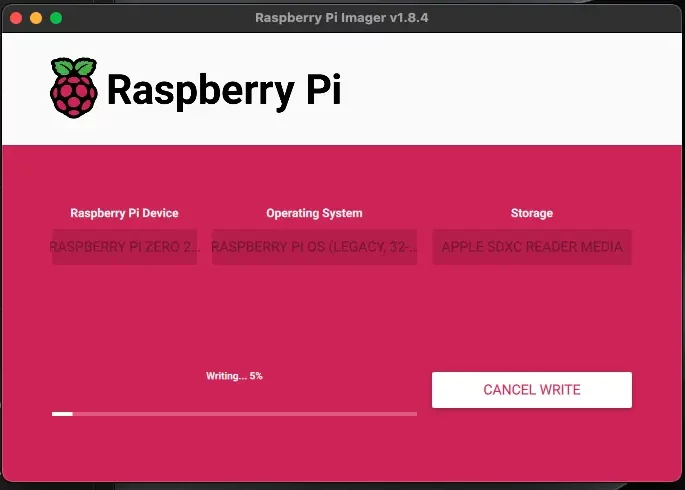
You can go ahead and write the configuration to the card.
Headless USB Setup
You can access the. Raspberry Pi Zero 2 W headless (without a screen, keyboard and mouse) by setting up USB OTG (On The Go).
You need to edit some files on the SD card, using a code editor like Visual Studio Code or Notepad++.
You can download Visual Studio Code from here:
If you would like a privacy-focused version of Visual Studio Code, you can try VSCodium from here:
Or if you want to try Notepad++:
To enable headless USB OTG we need to load the dwc2 driver. According to the good people on the Raspberry Pi Forums, dwc2 is an upstream driver which can do the OTG host/gadget flip dictated by OTG_SENSE.
You can just browse the bootfs partition with your favourite editor.
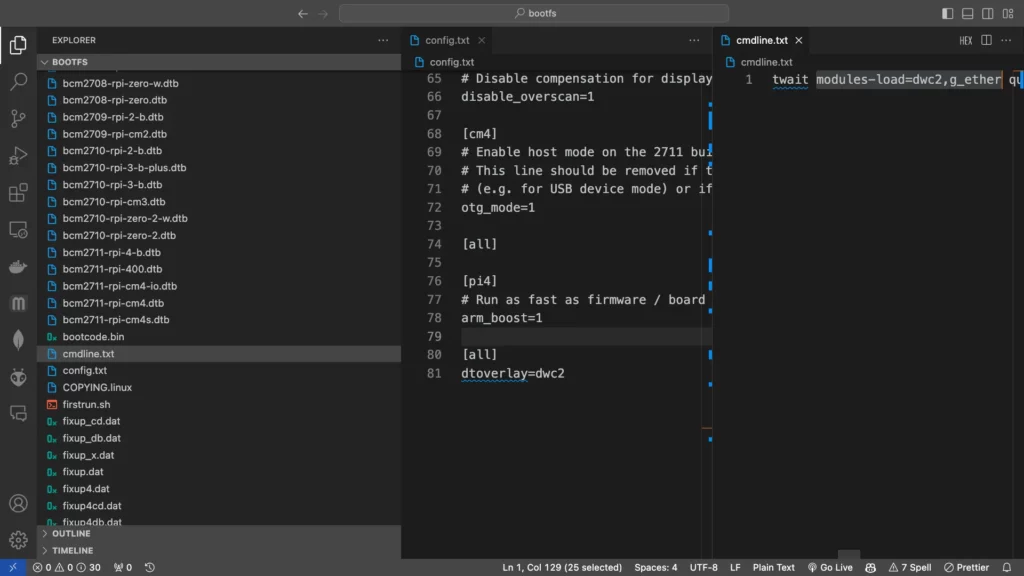
Search for rootwait in cmdline.txt. Add one space after rootwait and paste in the following:
modules-load=dwc2,g_etherOpen config.txt and type the following under the [all] section:
dtoverlay=dwc2Create a blank file and name it ssh, with no extension. This will enable ssh on the pi zero.
Make sure you save all files. If in doubt, check out the screenshot below.
You can now unplug the card from your machine and plug it into the Raspberry Pi.
Connecting to the Raspberry Pi Zero 2 W With SSH
This section will show you how to establish a secure shell (SSH) between your machine and your Raspberry Pi Zero 2 W. You can use your terminal to install, update, and configure the libraries.
Windows
There are a few prerequisites which are required to connect to your Raspberry Pi through a Windows machine:
- Bonjour
- Putty
Note: Connecting the Raspberry Pi 2 Zero W to Windows 10 through USB OTG can make the USB not recognised by the driver as USB Ethernet/Gadget. If this is the case, I wrote a post with the fix, which you can find here:
https://albert-fit.com/how-to-fix-windows-10-raspberrypi-usb-otg-ethernet-gadget/
Bonjour
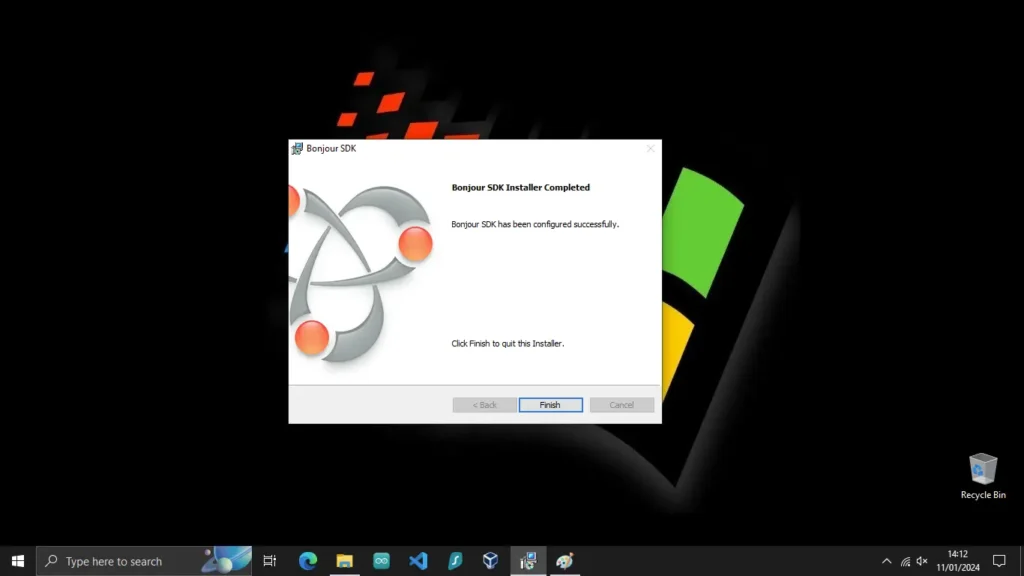
Strangely, you need Bonjour to get Raspberry Pi to talk to Windows over a local network.
According to Free Code Camp, Bonjour is Apple's implementation of zero-configuration networking (zeroconf). It allows devices running Windows and Apple operating systems (like macOS and iOS) to connect and share resources without configuration settings.
Bonjour allows you to locate other devices, such as scanners and printers, on a local network and connect with them. It also will enable you to share files irrespective of your operating system, whether it's Windows, macOS, or Linux.
Bonjour will be installed on a Windows machine when setting up iTunes. You can also download and install the Bonjour SDK from:
https://developer.apple.com/bonjour/
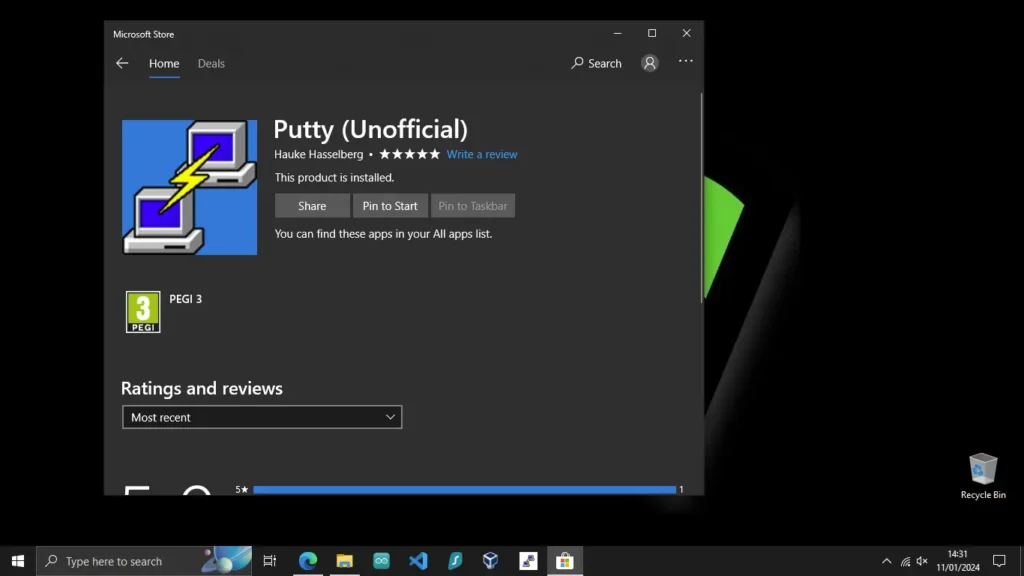
Putty
According to SSH.com, PuTTY is a versatile terminal program for Windows. It is the world's most popular free SSH client. Putth supports SSH, telnet, and raw socket connections with good terminal emulation. Putty also supports public key authentication and Kerberos single sign-on. It also includes command-line SFTP and SCP implementations.
You can download Putty from:
The official page:
https://www.chiark.greenend.org.uk/~sgtatham/putty/latest.html
or the Microsoft Store:
Once you have installed putty, you can ssh into your Raspberry Pi by typing your hostname in the following format:
[user]@[hostname].local
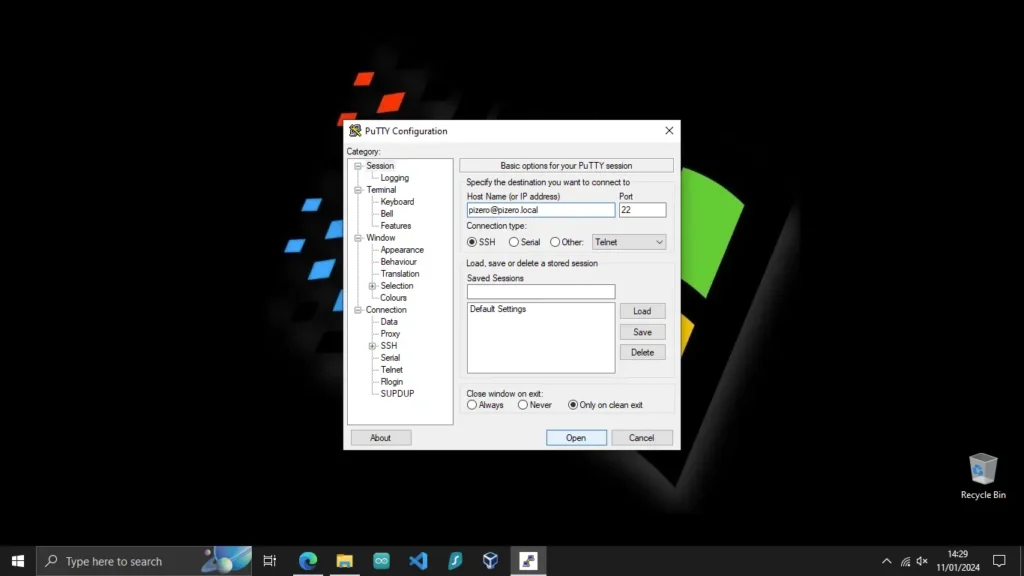
You will then be prompted for your password, which you set up in the Pi Imager under username and password OS configuration.
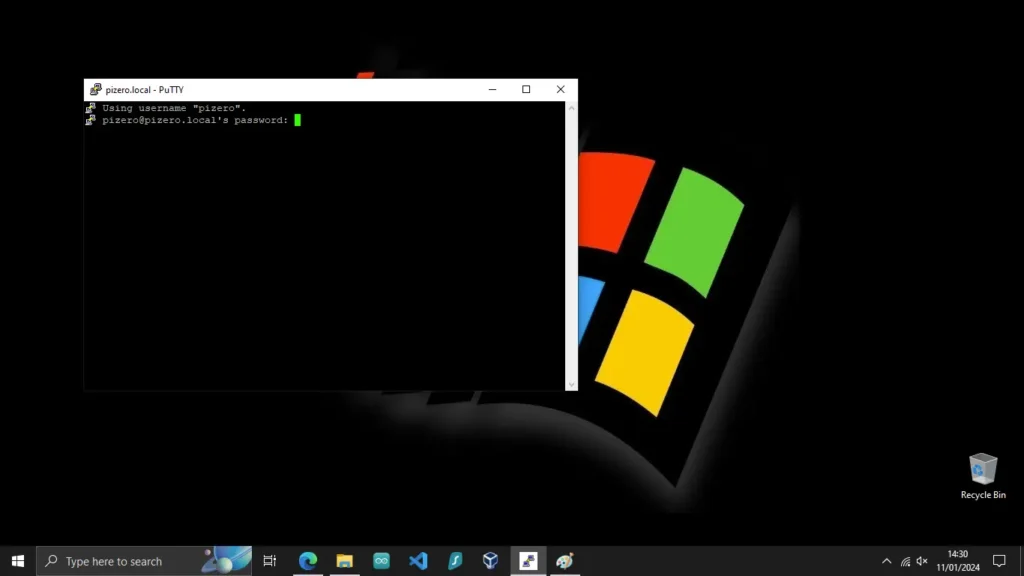
Upon a successful connection, the putty window text displayed gives you the [username]@[hostname]:~$ line

Mac
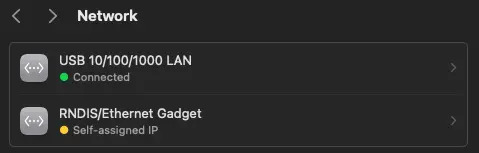
No additional software is required to connect the Raspberry Pi Zero 2 W to a Mac machine. You can verify if your USB OTG setup is working by navigating to Network in Settings, where you will be able to see the RNDIS/Ethernet Gadget.
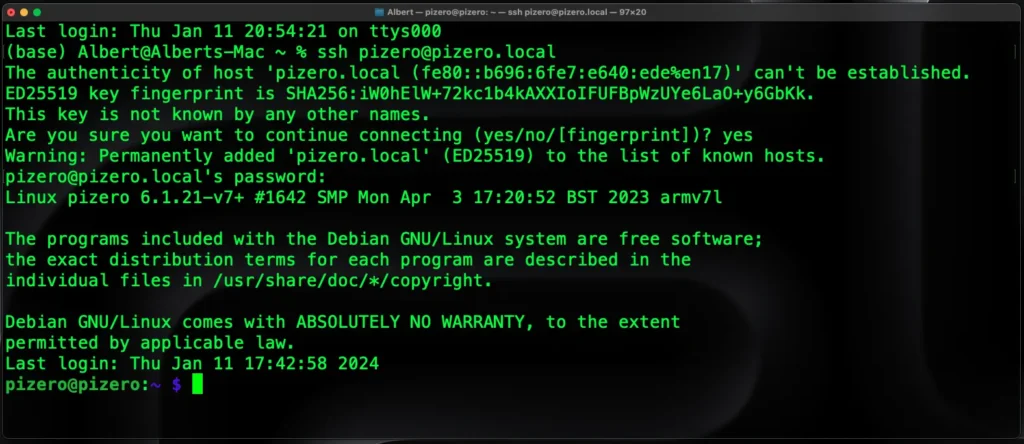
Once connected, you can open a terminal window (cmd + space to open Spotlight and type terminal). In the terminal, type ssh [username]@[hostname]. Just so you know, the authenticity of the host won't be established (because we have just created it). You can type yes to continue, and you will be prompted to insert the password, which you set up in the Pi Imager under username and password OS configuration.
When successfully connected, you will be greeted by [username]@hostname:~ $
Linux (Debian based)
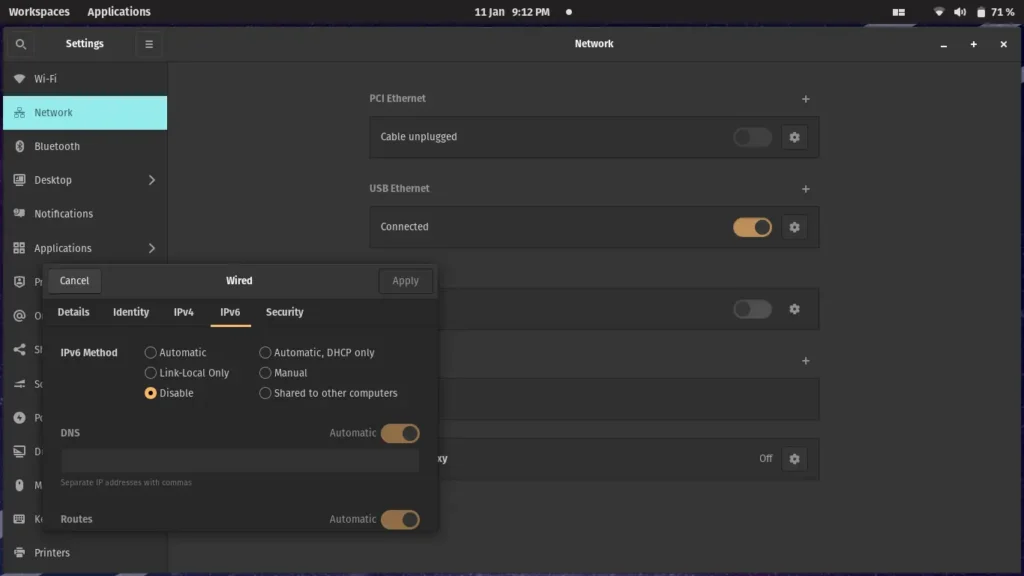
I currently run a Pop Os! machine, and I know the following settings to work for USB OTG on any Debian based distribution:
- Plug the Raspberry Pi into your Linux machine
- Go to Network -> USB Ethernet
- Set the IPv4 to Link-Local Only
- Set the IPv6 to Disable

You can now ssh the same way as you do with mac:
- Open a terminal window
- type ssh [username]@[hostname].local (for example ssh pizero@pizero.local)
- agree to adding the host to known hosts, and
- Input your password.
Updating Raspbian
First, let's update the system. Connect to the Raspberry Pi with ssh and type the following in the terminal window:
sudo apt update
sudo apt full-upgrade
sudo reboot
The Sudo is a command-line utility for Unix-based systems. The utility provides an efficient way to temporarily grant users or user groups privileged access to system resources to run commands they cannot run under their regular accounts.
The apt command is a powerful package management utility used primarily in Debian-based distributions, including Ubuntu. It performs package management tasks, such as installing, removing, and upgrading software packages.
In Linux-based operating systems, mainly Ubuntu, the command essentially instructs to update the local package index. It downloads package details from all set sources to refresh the package cache. The package manager (in this case, ‘apt’) must know which packages are available and where to find them to install software or packages on your system. You can read more about it on linuxsimplify.com.
According to Kris Koishigawa, the "full upgrade" command downloads and installs the updates for each outdated package and dependency on your system.
The "autoremove" command will search for any packages and dependencies that are no longer required and remove them.
sudo apt autoremove
sudo apt clean
The "clean" command will clean up the cache.
Installing RealVNC
RealVNC is one of the many ways you can gain remote access to your Raspberry Pi Zero 2 W. Install RealVNC on your Raspberry Pi by typing the following in the ssh terminal:
sudo apt install realvnc-vnc-server realvnc-vnc-viewerYou now need to enable the VNC server on the Raspberry Pi:
sudo raspi-configHitting enter will Open the Raspberry Pi Software Configuration Tool.
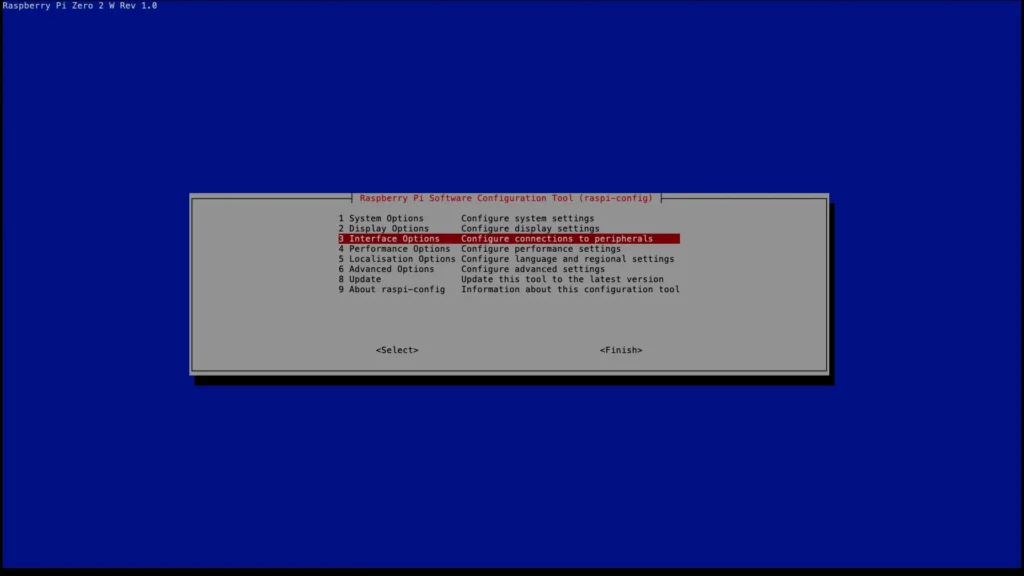
Navigate to the Interface Options.
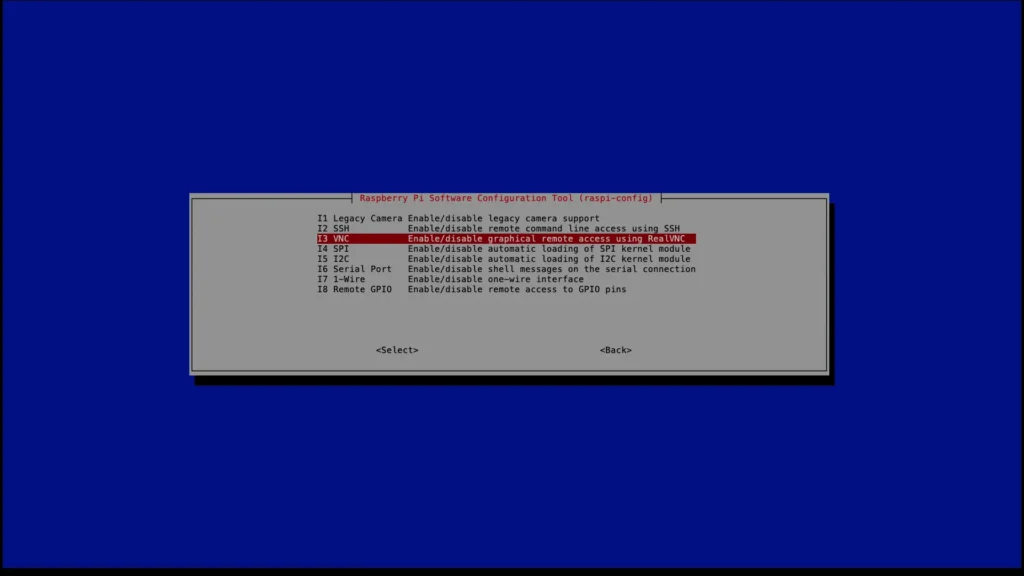
Select VNC and hit Enter.
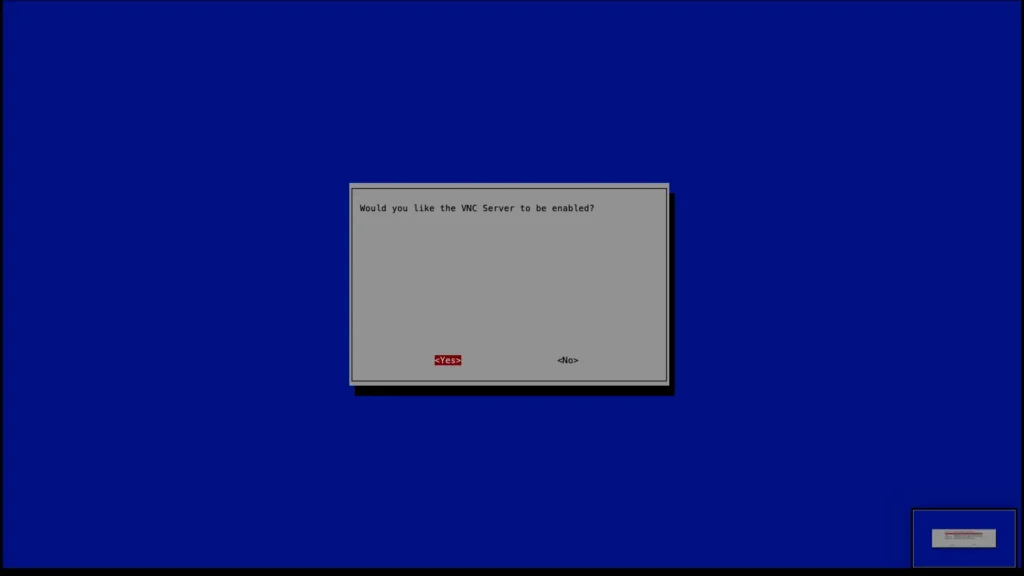
Hit enter again to enable the VNC.
Now, you can exit this menu by hitting Esc, Esc.
RealVNC Client
Download the client from the following link:
https://www.realvnc.com/en/connect/download/combined/
You do not have to sign up to download and use the client on your local network.
Click on "Use only for direct or offline connectivity".
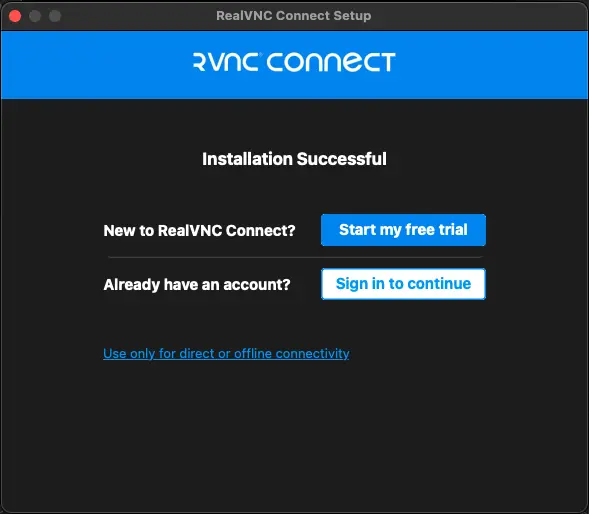
You can make an account if you'd like to. If you do not wish to create an account, click "Use RealVNC Viewer without signing in".
Type the following command to get the IP of the Raspberry Pi from the window where you have the SSH connection open:
hostname -I
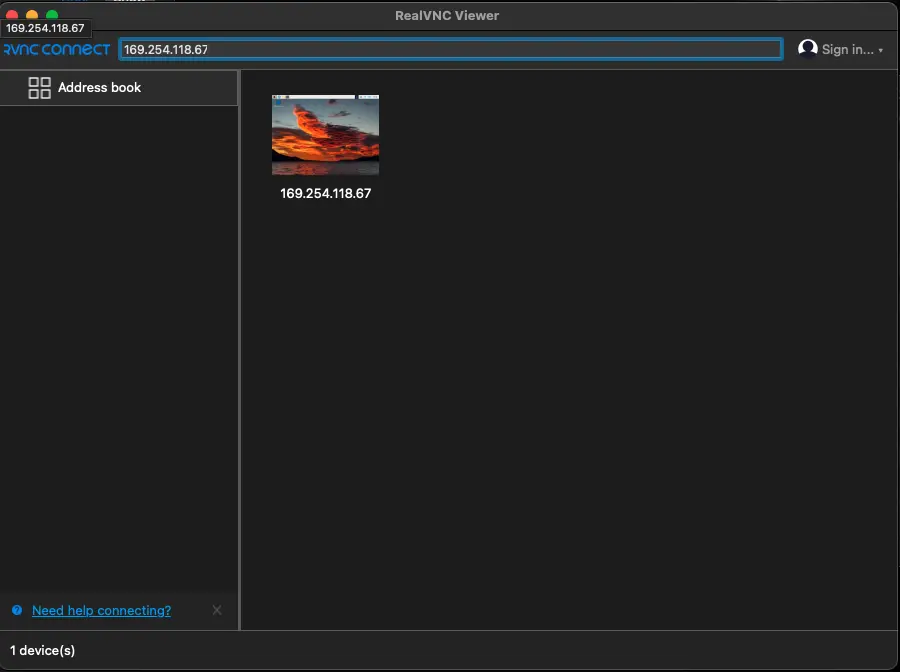
Copy the IP shown first with Ctrl+Shift+C and paste it in the "Enter a VNC Server address or search" bar.
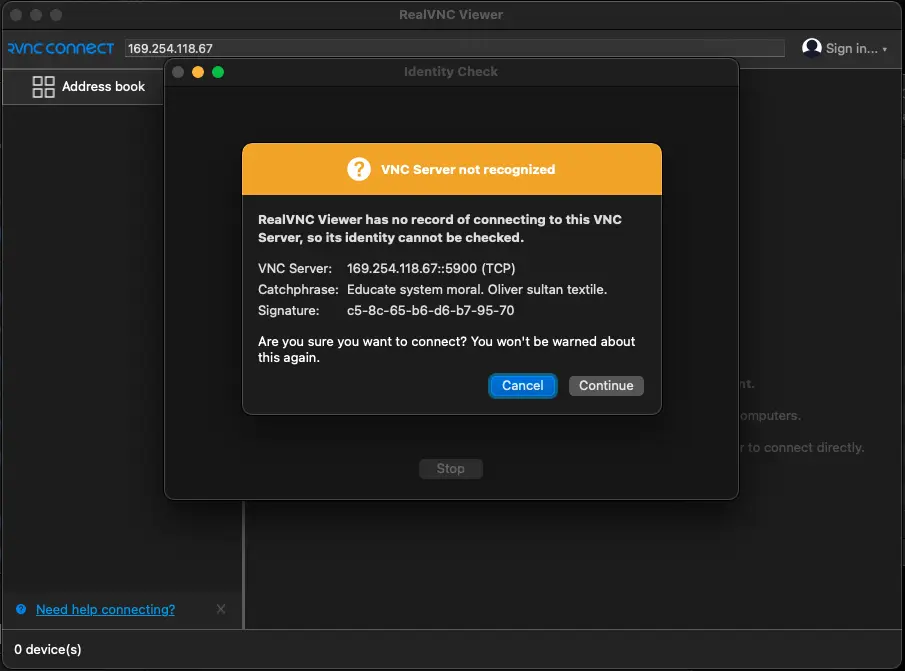
You will get the server identity check error, and you can continue. (You have just set up this server, so there is no identity to check).
Alternatively, you can connect with your hostname. local (in my example pizero.local).
Once you connect, the connection will be saved under your connections.
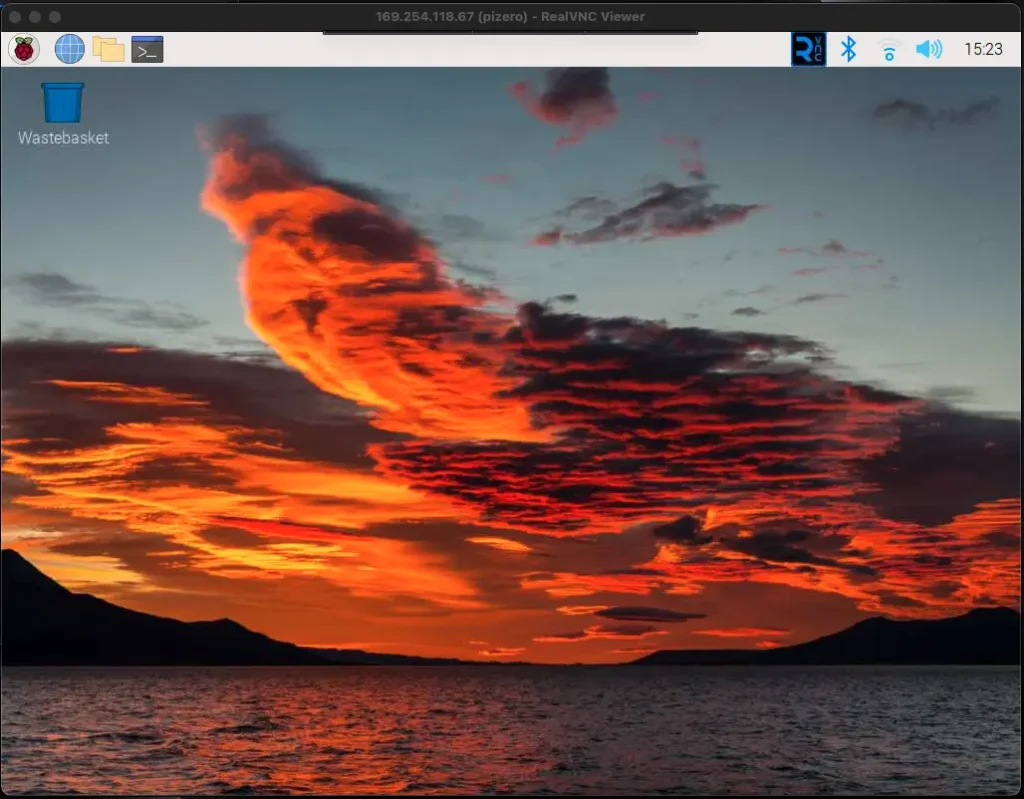
Now you should see the Raspbian Desktop in a window on your machine!
Conclusion
Congratulations on your Raspberry Pi Zero 2 W setup!
This tutorial details how to:
- Set up the SD card;
- Connect the Raspberry Pi with USB OTG
- Enable SSH
- Connect to the Command Line with SSH; and
- Install RealVNC to connect to the Raspbian Desktop.
Introduction
In this comprehensive guide, we'll tackle the common USB OTG connection issues when using the Raspberry Pi Zero 2 with Windows 10.
The problem is that when you connect the Raspberry Pi Zero 2 W, it first gets identified as a USB Serial Device on a COM port.
Thankfully, we can overcome this by installing the RNDIS driver for the USB device.
I have uploaded the specific driver on my GitHub page, and you can find it here:
https://github.com/albert-fit/windows_10_raspi_usb_otg_fix
Connect the Raspberry Pi with USB OTG
As in the image above, you can connect the Raspberry Pi by plugging the USB into the connector closest to the HDMI port.
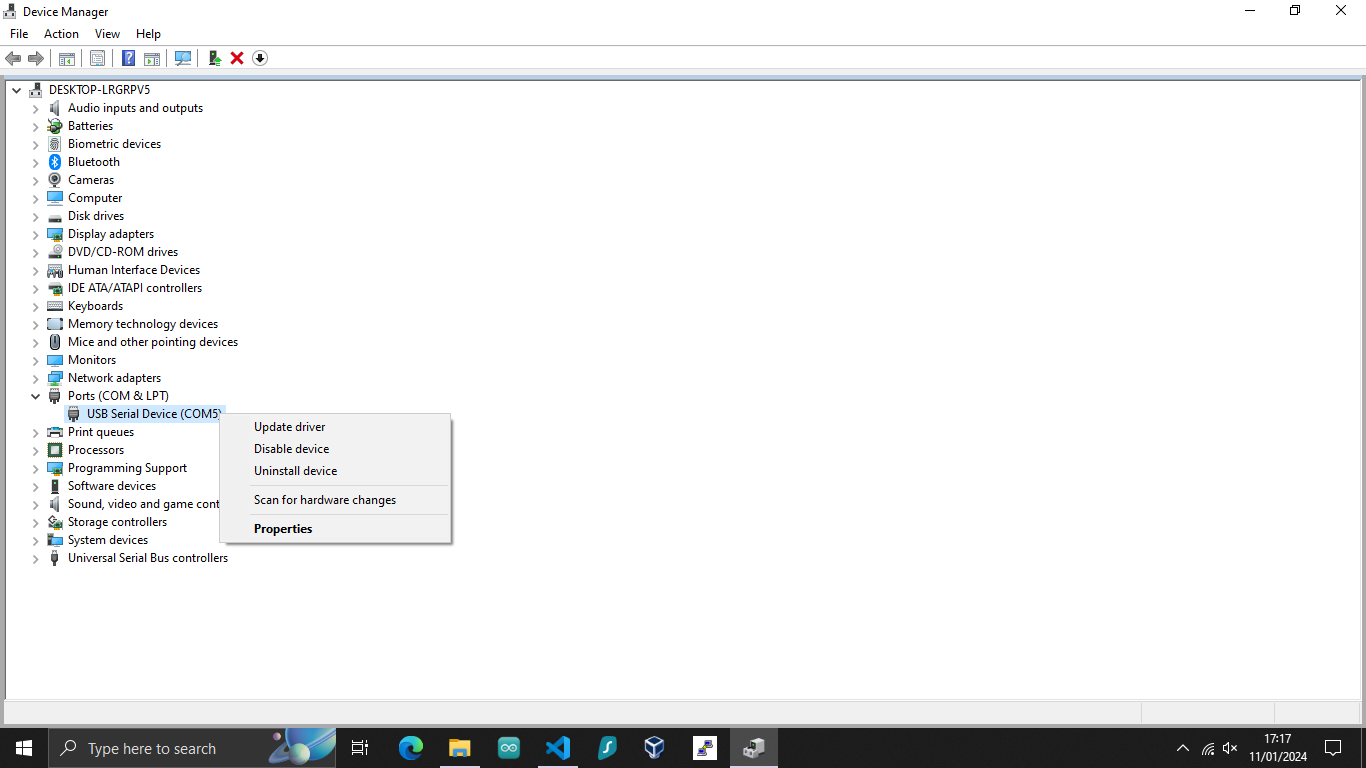
Open up Device Manager and Find the USB Serial Device
Once connected, the Raspberry Pi green light will be on, and you should see the device in your device manager's Ports (COM & LPT) section.
To open the device manager, press the windows symbol on your keyboard and type Device Manager. Click on the first result.
Note: If you do not see the Raspberry Pi in the Ports section, try checking the following:
- There is a valid installation on the SD card, and it is inserted properly.
- You have added modules-load=dwc2,g_ether after rootwait in cmdline.txt (found in bootfs or boot on the SD card)
- Added dtoverlay=dwc2 at the end of the config.txt file (found in bootfs or boot on the SD card)
- And finally, make sure your cable is of good quality and transfers data (some only charge).
Updating the horndis Driver for USB OTG
To update the driver, right-click on the USB Serial Device and click on Update Driver.
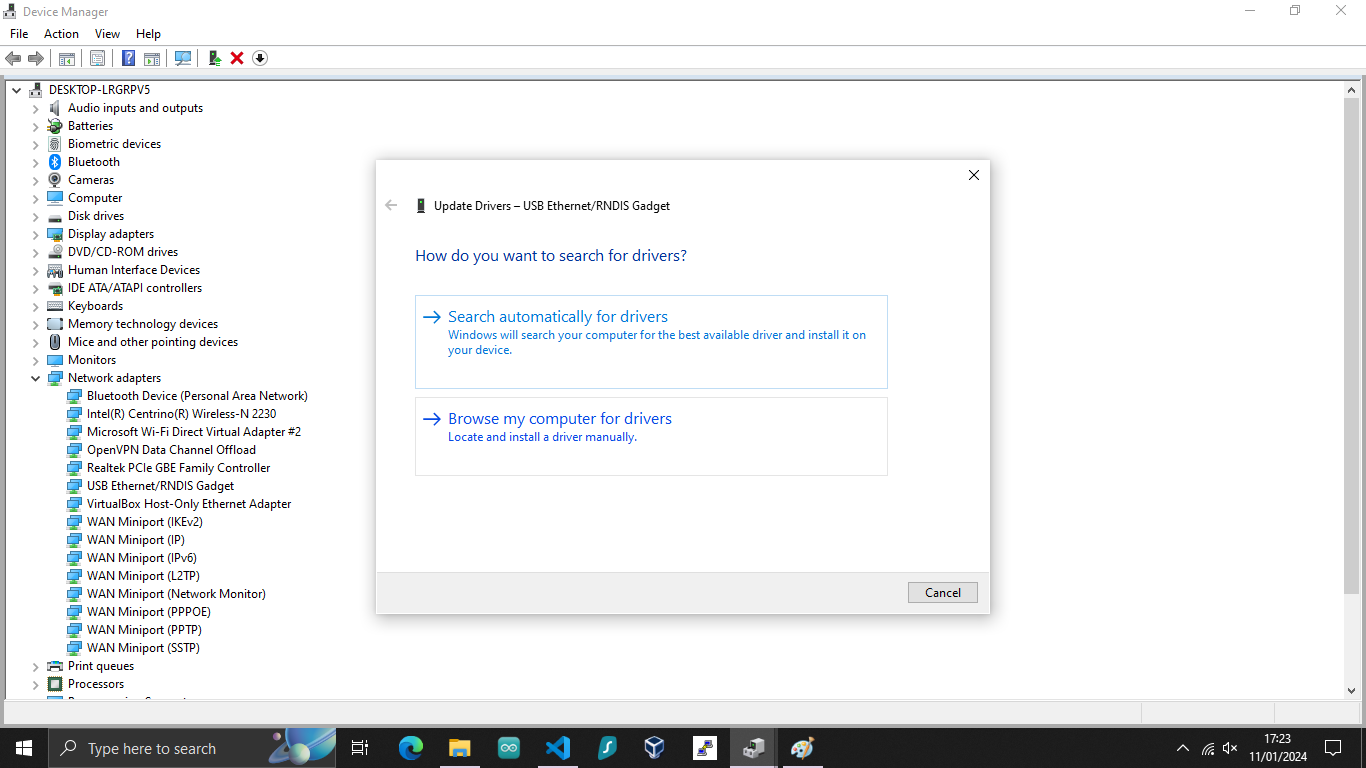
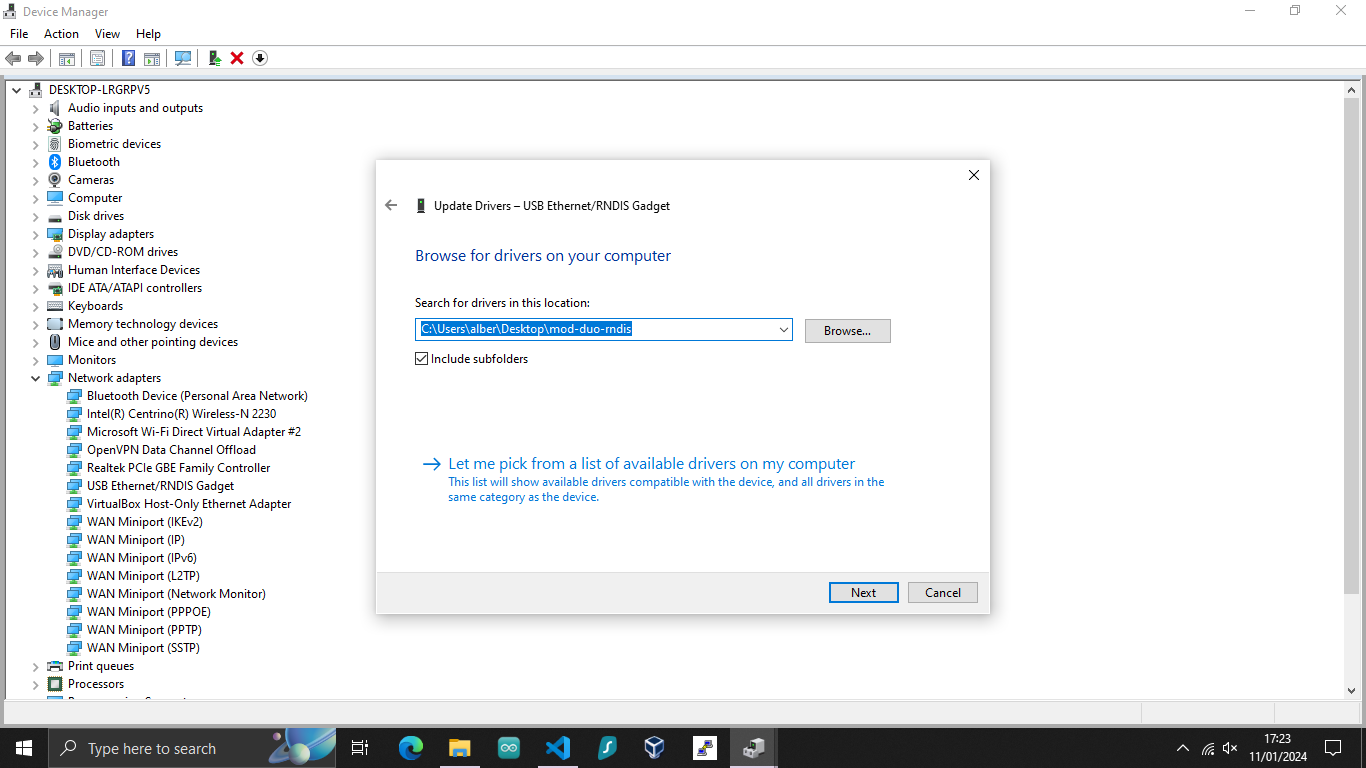
You can just select the folder you have unzipped when downloading the driver.
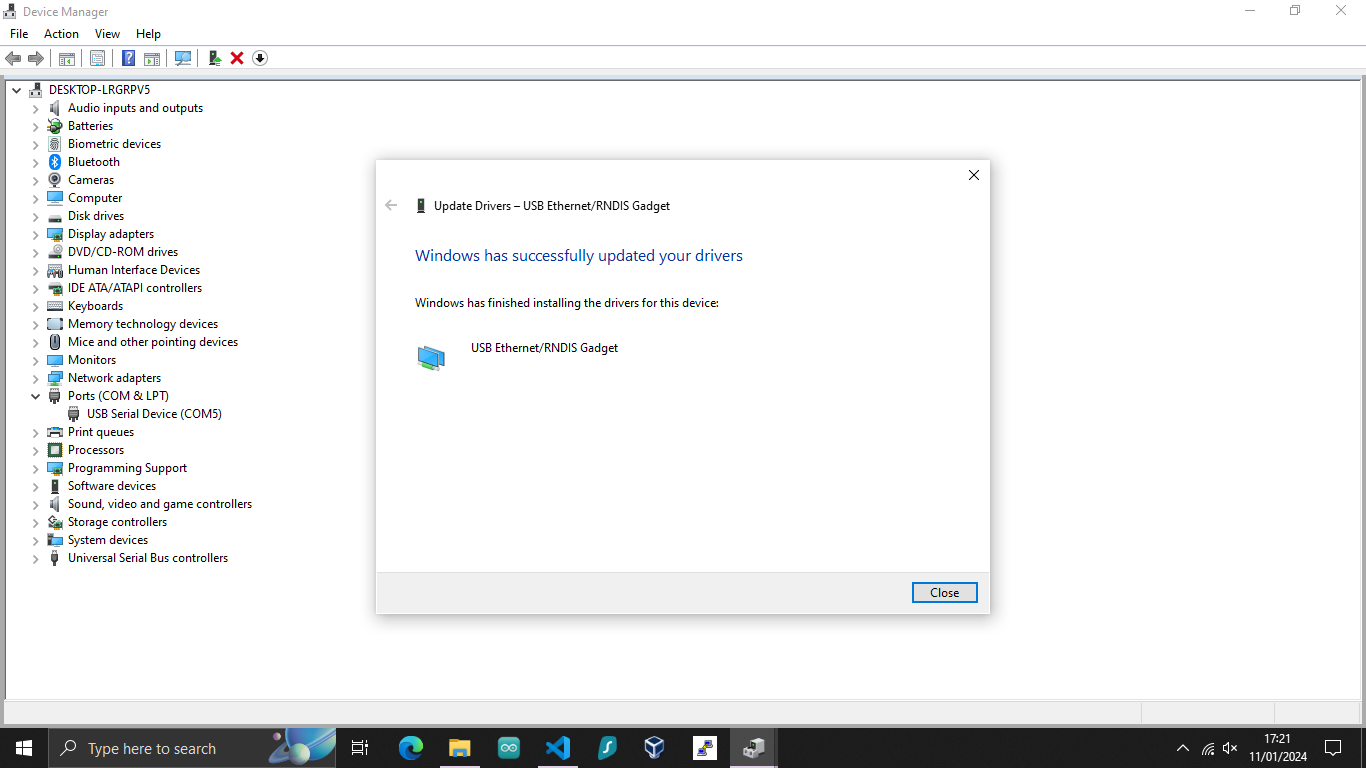
Once the update is complete, the device will show as a USB Ethernet/RNDIS Gadget.
Testing the USB OTG connection
You can check it works as it should by navigating to Network & Internet Settings and clicking on the new Ethernet connection.
You should see the USB Ethernet/RNDIS Gadget in the description.

Conclusion
Congratulations! You can now go ahead and try to SSH or VNC with your favourite clients.
If you would like to purchase a Raspberry Pi Zero 2 W, here are some affiliate links:
Raspberry Pi Zero 2 W on amazon.co.uk
Credits:
This post was largely inspired by MatsK.
I. Introduction to Autonomous Deliveries
In an era of rapidly advancing technology, drones and autonomous delivery robots have captured our imagination. These innovations promise a future where unmanned vehicles handle parcel deliveries with efficiency and speed. Despite the exciting possibilities, the widespread adoption of drones for parcel delivery remains a work in progress.
This blog post explores the landscape of autonomous deliveries, shedding light on the progress and challenges ahead. We delve into the world of delivery drones, examining their innovative technologies, potential benefits, and limitations. We also discuss real-world success stories, such as medical supply deliveries to remote areas and parcel deliveries by industry giants like Amazon and Google.
Additionally, we investigate the regulatory framework governing autonomous delivery systems in different countries, focusing on their efforts to ensure safe and responsible deployment. Moreover, we uncover the technical challenges that engineers and developers are actively addressing to make autonomous drone and robot deliveries a reality, from improving battery technology to enhancing navigation in diverse conditions.
Join us on this journey through the complex terrain of autonomous deliveries, where innovation meets regulation, and technology advances in the pursuit of transforming how we receive our packages. The future of deliveries is closer than we think, and this post explores the steps required to turn that vision into a tangible reality.
II. Delivery Drones: Innovation and fulfilment
Delivery drones are unmanned aerial vehicles (UAVs) designed for transporting packages. Drones utilise various mechanisms for flight, such as propellers, wings, or rotors, allowing them to fly vertically or horizontally. They can deliver or retrieve packages using parachutes or landing pads and rely on remote control or autonomous navigation systems to follow predefined routes or dynamic algorithms.
Delivery drones offer several advantages over conventional delivery methods, including:
- Swift access to remote or inaccessible areas compared to ground vehicles.
- Reduced road congestion and pollution due to their electric power source.
- Enhanced efficiency and reliability by avoiding traffic delays and human errors.
- Improved customer experience through faster delivery times and real-time tracking.
However, they also face certain challenges and limitations, such as:
- limited payload capacity,
- battery life,
- the need for complex technology and infrastructure,
- regulatory approval, and
- Concerns about privacy, theft and property damage.
Numerous companies are actively vying for market share in this field. The following section highlights some notable successes in the industry.
1.1 Medical Supplies
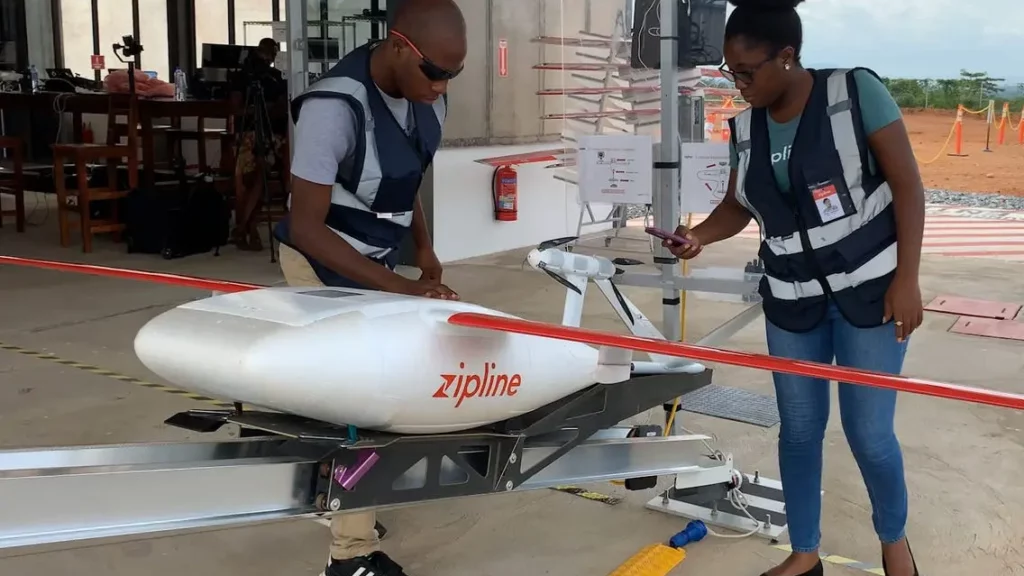
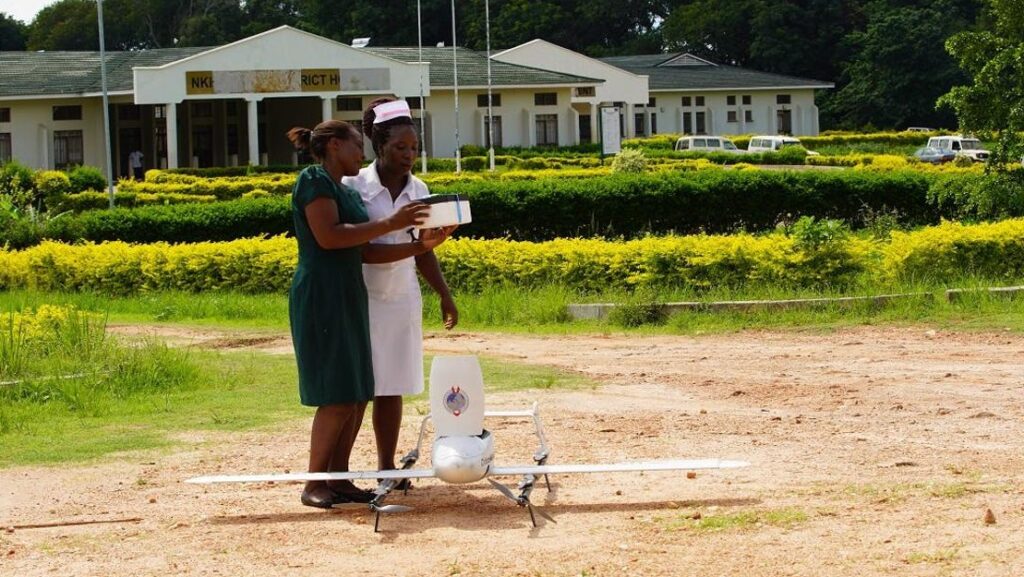
Zipline - delivering medicine, blood and other medical supplies in remote areas
The delivery of medical supplies to remote areas has been a compelling use case for drones. Companies like Zipline have excelled in this domain, providing life-saving deliveries to regions with limited access to healthcare resources. Zipline, for instance, delivers a significant portion of Rwanda's blood supply outside the capital, Kigali. In 2022, Zipline achieved FAA Part 135 approval for long-range delivery drones in the U.S., marking a significant milestone in the industry.
According to a number of publications in 2022, Zipline's service achieved the following impact:
- A reduction of 67% in blood wastage across Rwanda (published in The Lancet);
- 60% shorter vaccine stockouts as compared to non-Zipline services (Bill and Melinda Gates Foundation);
- An 88% reduction of in-hospital maternal deaths due to postpartum haemorrhage (Wharton university)
Platform: Fixed-wing
Range: 120+ miles round trip
Delivery Mechanism: Parachute from 60-80 ft above ground level
Payload: 4 pounds
Operational Areas: Rwanda, Ghana, U.S. , Nigeria, Japan, Kenya, Cote D'Ivoire.
Founded in: 2014
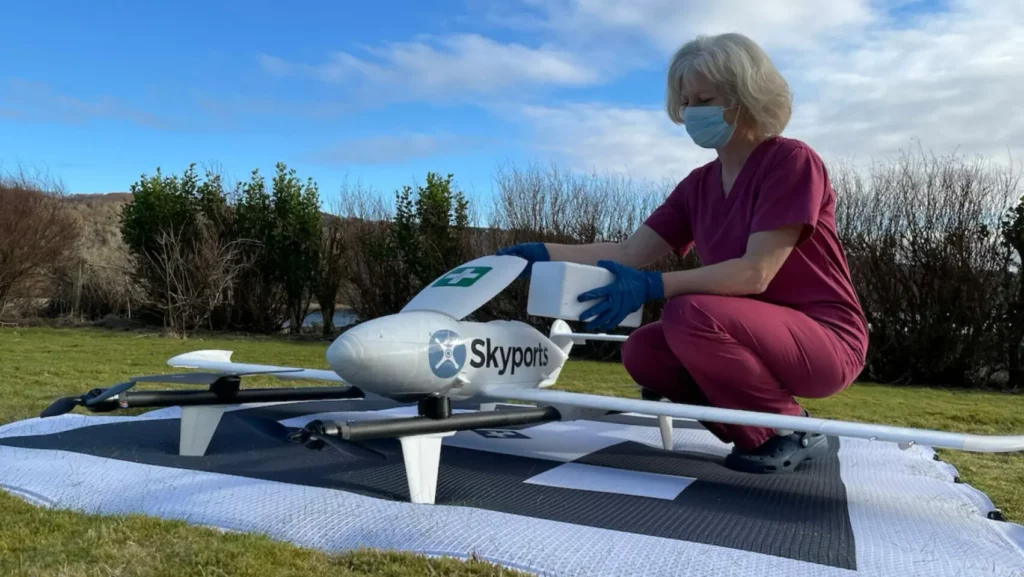
Skyports - The first operator to bring drone deliveries in the U.K.
Skyports, a UK-based company, pioneered drone deliveries in the United Kingdom by transporting test samples, PPE, and COVID-19 tests between Mull, Iona, and Oban, Scotland. They received permission from the UK Civil Aviation Authority (CAA) to carry diagnostic specimens by drone.
Platform: Multi-Rotor VTOL Transition
Range: 120+ miles round trip
Delivery Mechanism: Parachute from 60-80 ft above ground level
Payload: 4 pounds
Operational Areas: U.K.
Founded in: 2018
Swoop Aero - Creating versatile drones to help with essential deliveries in remote areas
Swoop Aero, an Australian company founded in 2017, specialises in developing and operating drone-based logistics solutions for healthcare and other industries. They have gained recognition for delivering medical supplies, vaccines, and healthcare services to remote communities.
Platform: Multi-Rotor VTOL Transition
Range: 108+ miles round trip
Delivery Mechanism: Ground Level
Payload: 6.6 pounds
Operational Areas: Albania, Malawi, Singapore, Ethiopia, the Democratic Republic of Congo, Mozambique, Eswatini and Australia
Founded in: 2017
1.2 Parcel Deliveries
Last-mile delivery accounts for over 50% of total delivery costs and contributes to global CO2 emissions. Companies like Amazon, UPS, and Google have embarked on innovations in autonomous drone parcel delivery systems to address these challenges.
Amazon Prime Air - MK30 - A heavy lift fast delivery drone
Amazon Prime Air unveiled the MK30 drone, equipped with "sense and avoid" technology for obstacle detection. These drones can carry packages up to five pounds and operate in various weather conditions, making one-hour or less deliveries.
Platform: Multi-Rotor VTOL transition
Range: Unspecified
Delivery Mechanism: Ground Level
Payload: 5 pounds
Operational Areas: Not operational yet
Scheduled to operate in the U.K, U.S and Italy in 2024
Founded in: 2013
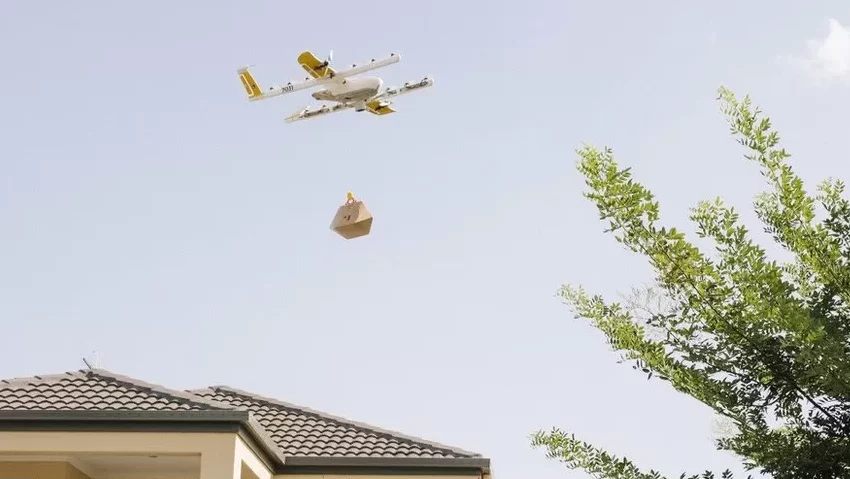
Google Wing - A drone delivery system built with safety in mind
Google's Wing project, now known as Wing, focuses on safety through redundancy, with multiple rotors, batteries, and navigation systems. The tether system disengages upon reaching the ground, eliminating the need for recipient interaction.
Platform: Multi-Rotor VTOL Transition
Range: 12 miles round trip
Delivery Mechanism: Tether
Payload: 2.6 pounds
Operational Areas: Australia, U.S, Finland and Ireland
Founded in: 2012
Matternet - Delivering medical supplies in urban areas and parcels
Matternet, authorised for commercial Beyond Visual Line of Sight (BVLOS) operations in Switzerland, partnered with UPS to launch drone delivery services in the U.S. Their M2 drone achieved Type Certification and Production Certification by the Federal Aviation Administration (FAA) in 2022.

Platform: Multi Rotor
Range: 108+ miles round trip
Delivery Mechanism: Proprietary pod
Payload: 4.4 pounds
Operational Areas: Switzerland, U.S.
Founded in: 2011
Flytrex - The suburban food delivery drone
Flytrex operates autonomous drone systems in Texas and North Carolina, primarily for food deliveries in suburban areas. Their drones feature safety mechanisms like lidar units for obstacle detection.
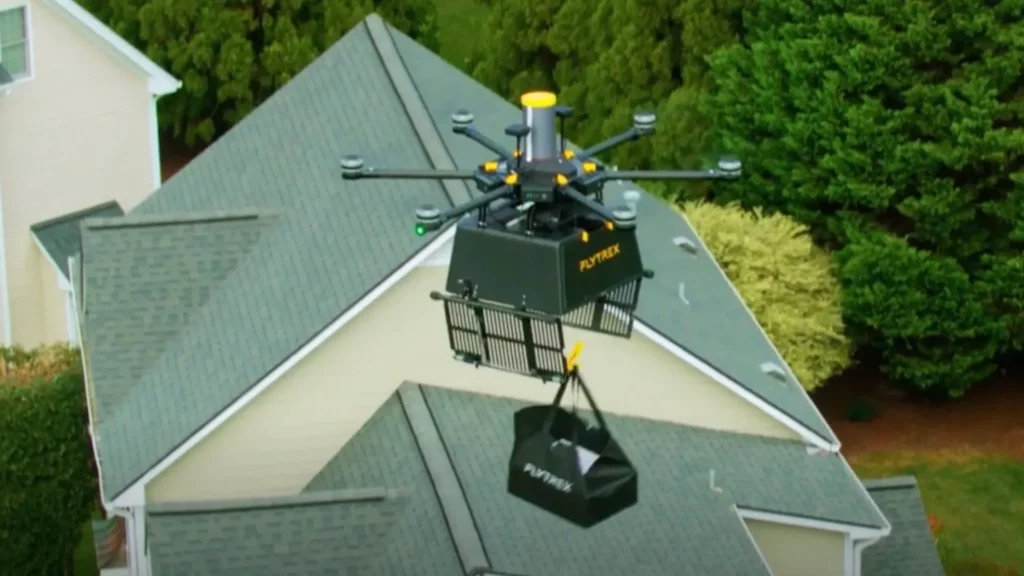
Platform: Multi Rotor
Range: 5 mile round trip
Delivery Mechanism: Ground Level
Payload: 5.5 pounds
Operational Areas: U.S.
Founded in: 2013
III. Delivery Drones: Regulatory Framework
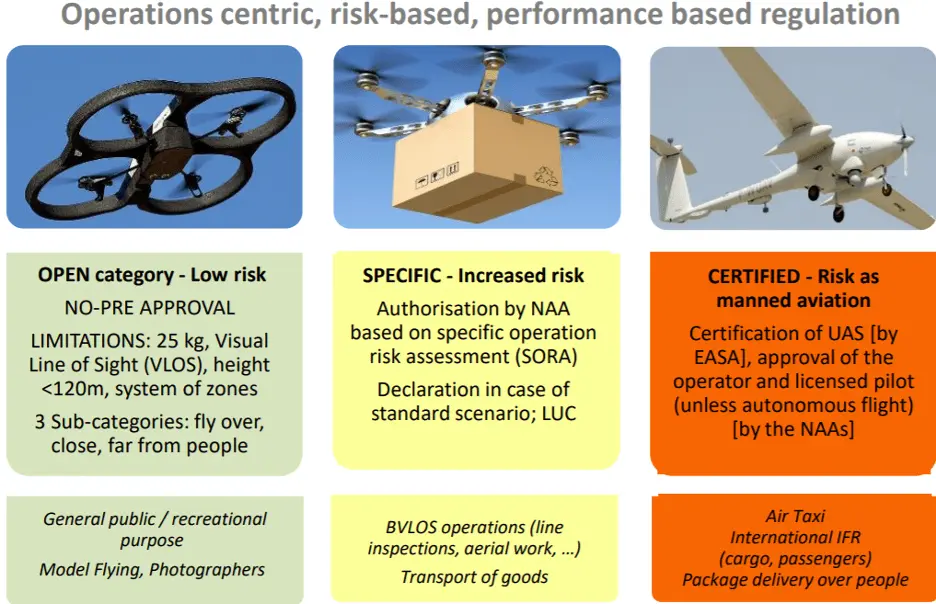
The UK has pioneered developing and testing delivery robots and drones, establishing a supportive regulatory environment for their safe use. The Civil Aviation Authority (CAA) serves as the primary drone regulator and has introduced regulations based on the EU's UAS Regulations, categorising drones into Open, Specific, and Certified categories.
3.1: The UK's Approach: CAA Drone Rules and Regulations Overview
The Open category covers low-risk drone flights that do not require prior authorisation or operational declaration but must follow certain limitations, such as maximum weight, height, distance, and speed.
The Specific category covers medium-risk drone flights that require operational authorisation from the CAA based on a risk assessment. This is the category that fits autonomous delivery drones.
The Certified category covers high-risk drone flights that require a certification of the drone, the operator, and the pilot, similar to manned aviation.
CAA helping innovators get off the ground
The CAA also runs several innovation programmes to facilitate the development and testing of new drone technologies and applications, such as the Innovation Sandbox and the Future Flight Challenge. These programmes provide a safe and flexible environment for drone operators to trial new concepts and solutions, such as beyond visual line of sight (BVLOS) operations, urban air mobility (UAM), and drone delivery services.

3.2 Drone Regulations in Other Countries
Other countries have also been developing their own regulatory frameworks for delivery robots and drones, with varying degrees of progress and complexity. For example:
USA
In the US, the Federal Aviation Administration (FAA) regulates drone operations under Part 107 of the Federal Aviation Regulations (FARs), which sets out the requirements and limitations for commercial drone operators. However, some advanced drone operations, such as BVLOS or over people, require a waiver or exemption from the FAA. The FAA also runs several programmes to support drone innovation and integration into the national airspace system (NAS), such as the Unmanned Aircraft System (UAS) Integration Pilot Program (IPP) and the UAS Traffic Management (UTM) Pilot Program.
China
In China, the Civil Aviation Administration of China (CAAC) regulates drone operations under several regulations and standards, such as the Regulations on Management of General Aviation Flight Activities (2016), which defines drones as general aviation aircraft. The CAAC also issues licenses and permits for drone operators based on their type and purpose of operation. China has been a global leader in drone delivery services, with companies such as JD.com and SF Express conducting millions nationwide deliveries.
Australia
In Australia, the Civil Aviation Safety Authority (CASA) regulates drone operations under Part 101 of the Civil Aviation Safety Regulations (CASRs), which sets out the rules and requirements for different types of drone operators, such as recreational, commercial, or excluded. The CASA also runs several programmes to facilitate drone innovation and integration into the Australian airspace system, such as the RPAS Digital Platform and the Emerging Aviation Technology Partnerships. There is no national regulation for delivery robots, but some states have issued permits or exemptions for their use on public roads.
IV. Delivery Drones: Technical Challenges and Limitations
As the world eagerly anticipates the future of autonomous drone deliveries, it must recognise that while this technology holds great promise, it also faces several significant technical challenges and limitations. In this section, we'll delve into some of the critical hurdles engineers and developers are working to overcome to make drone deliveries a reality.
4.1. Battery Technology
One of the most pressing challenges in the realm of drone deliveries is battery technology. While drones have made substantial strides in energy efficiency, battery capacity, and overall flight time, there's still room for improvement. The limitations of current lithium-ion battery technology mean that drones typically have relatively short flight times compared to their ground-based counterparts.
The need for extended flight durations becomes evident when considering long-distance deliveries or covering vast urban areas. Researchers are actively exploring alternative energy storage solutions, such as hydrogen fuel cells and advanced battery chemistries, to address this. These innovations boost drone endurance, making deliveries more practical and cost-effective.
Drone batteries currently use Lithium Ion (Li-Ion) or Lithium Polymer (Li-Po) technologies. One particular feature of these batteries is that they degrade with time, and eventually, they reach a point of instability where the fire is a real risk. Many hobbyist houses have been burnt down by old Li-Po batteries that self-ignited. In addition, lithium batteries generate oxygen, which makes the fire almost impossible to extinguish fully.
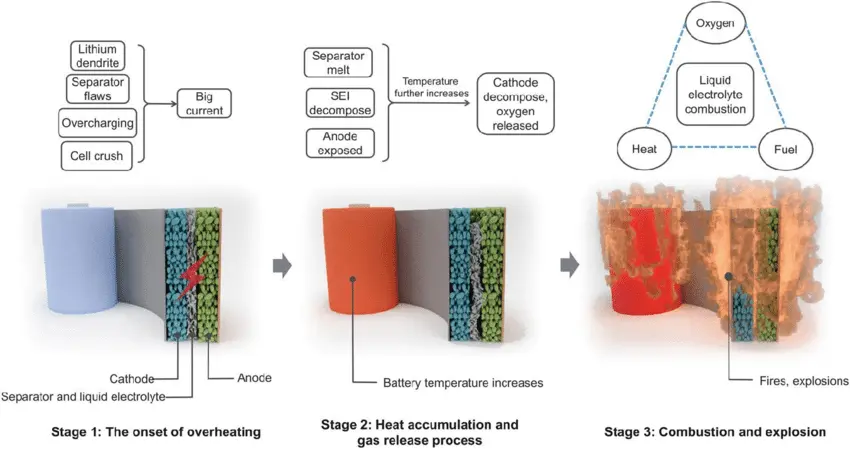
A potential solution for the problems imposed by Li-Ion and Li-Po is to use solid-state batteries. Solid-state battery technology offers several advantages over traditional lithium-polymer (Li-Po) batteries.
Firstly, solid-state batteries are safer due to their reduced risk of thermal runaway and fire, as they don't contain flammable liquid electrolytes.
Secondly, they have the potential for higher energy density, which means they can store more energy in a smaller and lighter package, leading to longer-lasting and more efficient power sources for various applications, including drones and electric vehicles.
Additionally, solid-state batteries tend to have longer lifespans and improved cycle durability, making them more cost-effective in the long run. These advantages make solid-state batteries a promising technology for various electronic devices and transportation solutions.


4.2. GPS Signal Loss
Drones rely heavily on Global Positioning System (GPS) signals for navigation and precise location tracking. However, GPS signals can be susceptible to interference and loss, particularly when flying in urban canyons or densely wooded areas. This can lead to inaccurate positioning and potentially hazardous situations for drones during deliveries.
To mitigate this issue, drone developers are exploring additional navigation and localisation technologies, including computer vision, radar, and LiDAR. These complementary systems can help drones maintain their course and avoid obstacles even when GPS signals are unreliable.

4.3. Sensors and Autonomous Flights
Autonomous flight is at the heart of drone deliveries, allowing them to navigate complex environments and reach their destinations safely. Achieving a high level of autonomy requires advanced sensors and sophisticated algorithms. While drones equipped with sensors like ultrasonic, infrared, and LiDAR can perceive their surroundings to a certain extent, there are limitations to their capabilities.
One challenge is the detection and avoidance of moving objects, such as birds, other drones, or even humans, in real-time. Ensuring collision avoidance and safe navigation in dynamic environments remains a technical hurdle. Developers are continually improving object recognition algorithms and sensor integration to enhance drone autonomy further.
Moreover, maintaining safe flight paths in unpredictable weather conditions is another challenge. Wind, rain, and fog can all affect a drone's stability and navigation, requiring robust flight control systems and AI-driven decision-making to adapt to changing circumstances.
Ai vision system improvements show promising results in helping overcome this technical challenge. One example is the case of the University of Zurich AI called Swift, which has outperformed human pilots around a drone racing track.

V. Delivery Robots: Rolling on the Pavements
We spoke about the advantages and disadvantages of delivery drones. And at this point, you might be thinking. What about those robots roaming the streets?
Delivery robots are small, wheeled vehicles that can carry packages on pavements, bike lanes, or pedestrian zones. They use cameras, sensors, GPS, and artificial intelligence to navigate their environment and avoid obstacles. They can also communicate with customers via smartphone apps or speakers to confirm delivery details and unlock the cargo compartment.
Some of the major players in this market are:
These companies have been testing and deploying their robots in various cities worldwide, delivering food, groceries, medicine, and other items.
5.1 Examples of Delivery Robots Use Cases
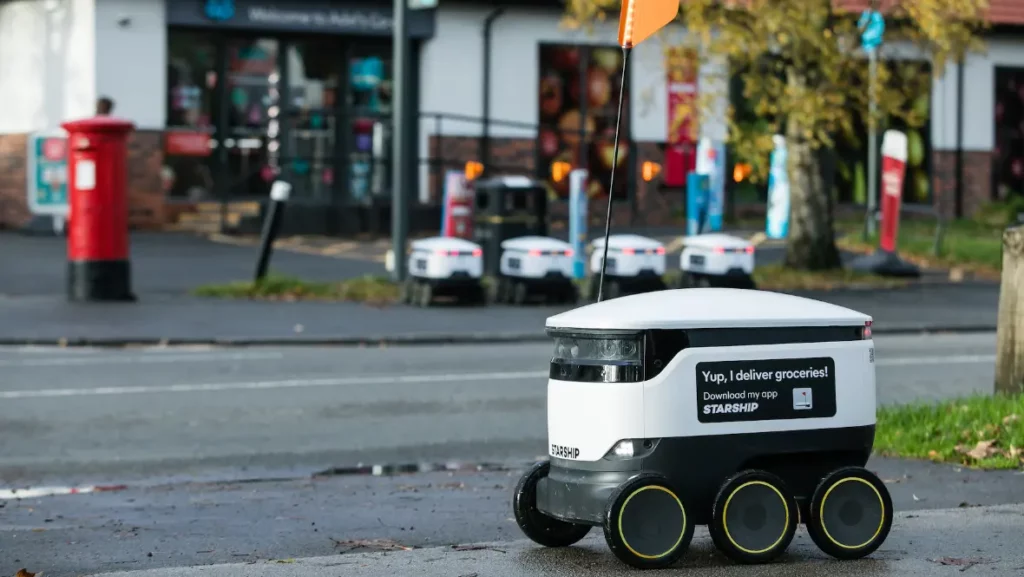
- Starship Technologies has partnered with universities in the US and UK to deliver food to students and staff on campus.
- Nuro has partnered with Kroger and Domino’s to offer groceries and pizzas in Houston.
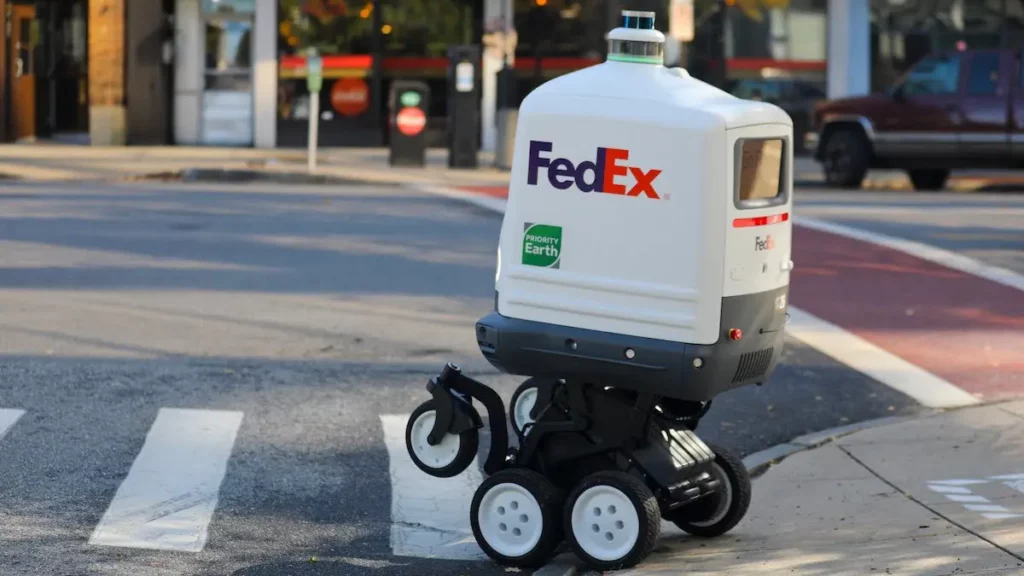
- FedEx Roxo has shown packages in several US cities, including New York, Los Angeles, and Memphis.
5.2 Advantages of Delivery Robots
Delivery robots have several advantages over traditional delivery methods, such as:
- 24/7 operations,
- reduced traffic congestion and emissions,
- lower labour costs and human errors,
- And increase customer convenience and satisfaction.
5.3 Challenges and Limitations
However, they also face some challenges and limitations, like:
- limited range and speed,
- require adequate infrastructure and regulation,
- need human supervision and intervention in some cases, and
- may encounter theft, vandalism, or accidents.
Delivery robots have yet to prove to be all their makers dreamt of. FedEx is stopping development on their last-mile delivery robot, Roxo. The news was first reported by Robotics 24/7, with FedEx confirming to the publication that the company would be shifting focus away from the bot to more “nearer-term opportunities.”
FedEx isn’t the only major U.S. company re-evaluating its robotic delivery efforts. Amazon has also decided to scale back its Scout automated delivery program. In a statement shared with The Verge, Amazon spokesperson Alisa Carroll said the company is ending field testing of Scout but will continue to have a team dedicated to its development.
In a statement offered to TechCrunch, Amazon notes the company isn’t killing the robot altogether but is instead scaling back the program. This is still a dramatic setback for the program, not to mention the 400 or so humans working on it. How small the new team will ultimately be remains to be seen.


VI. Conclusion
In conclusion, the world of autonomous drone and delivery robot technology is progressing excitingly, bringing us closer to the futuristic vision of efficient, fast, and environmentally friendly parcel deliveries. As we've explored in this post, there have been remarkable success stories in medical supply deliveries, where companies like Zipline have made life-saving contributions by reaching remote areas with essential supplies.
6.1 Parcel Deliveries
Moreover, when it comes to parcel deliveries, major players like Amazon, Google, and others have made significant strides in developing fully autonomous systems that can potentially revolutionise the last-mile delivery process. These innovations aim to reduce emissions, traffic congestion, and delivery costs while enhancing customer convenience.
6.2 Regulatory Frameworks
However, as with any emerging technology, regulatory challenges exist. Different countries are developing their regulatory frameworks to ensure the safe and responsible use of delivery drones and robots. These frameworks, like the ones set by the UK's Civil Aviation Authority (CAA), provide guidance on risk classification, operational limitations, and innovation support.
4.2 Technical Challenges
Technical hurdles, such as improving battery technology to extend flight times and enhancing navigation systems to overcome GPS signal loss and ensure safe, autonomous flights, remain. Innovations like solid-state batteries and alternative navigation technologies offer promising solutions to these challenges.
6.3 Advantages and Disatvantages
Additionally, the world of delivery robots presents its own set of advantages and challenges. While they offer 24/7 operations, reduced traffic congestion, and increased convenience, they still grapple with limited range and speed, the need for infrastructure and regulation, and occasional human supervision.
In recent developments, we've seen some major companies like FedEx and Amazon recalibrating their efforts in the delivery robot space, emphasizing the need for practical, near-term solutions while maintaining their commitment to further development.
6.4 Looking towards the future
In the grand scheme of things, the future of autonomous parcel deliveries remains bright, with continued innovation and collaboration between industry players, regulatory bodies, and technology enthusiasts. As we move forward, it's exciting to imagine a world where drones and delivery robots play a vital role in transforming how we receive goods, making our lives more efficient, convenient, and sustainable.
If you are interested in drone delivery and want to work on it yourself, these companies are currently hiring: Skyports Careers
If you would like to get started with building drones, you can find a great entry-level tutorial here: Oscar Liang: how to build an FPV drone
References:
- builtin.com
- Swift Ai FPV
- clean-mobility.org
- https://www.robotics247.com/company/flytrex
- prnewswire
- tech-crunch
- flyzipline.com
- expertmarketresearch.com
- mckinsey.com
- wired.co.uk
- starterstory.com
- aerosociety.com
- techradar.com
- eandt.theiet.org
- hansard.parliament.uk
- drone-laws.com
- gov.uk
- bbc.co.uk
- assets.publishing.service.gov.uk
- bbc.com
- thespoon.tech
Introduction to Early Computers and Microprocessors
You may have seen or heard about computers the size of a room: whirring tapes, glowing vacuum tubes, resistors, and capacitors, all in the thousands. Gates, buffers and flip-flops are all based on these components, forming the standard building blocks of electronic circuits today. In the 1970s, Intel invented the first general-purpose microprocessor, the 8088.
The IBM 8088

Intel 8088 General Processor
The 8088 was the heart of IBM's first personal computer. Continuous advancements in wafer circuit printing have made it possible to shrink the components required for a processor to tiny sizes. Core elements of today’s desktop or laptop computers are consistent with the first computers designed in the 1940s. The following section will shed insight into how computing ballistic firing tables in World War II defined CPU architecture for decades to the present day.
You can read more about IBM's 8088 here:
https://spectrum.ieee.org/chip-hall-of-fame-intel-8088-microprocessor
John Von Neumann
Von Neumann was a child prodigy. Born on December 28, 1903, to a wealthy Hungarian-Jewish family, he could divide two eight-digit numbers in his head by the age of six. By the age of 24, von Neumann had published 12 major papers in mathematics, and two years later, that number topped at 32, nearly one major paper per month. Von Neumann published over 150 papers: 60 in pure mathematics, 60 in applied mathematics and 20 in physics—the reminder on particular mathematical or non-mathematical subjects. John von Neumann was a devoted scientist.
US Army and Early Computers

U.S. Army Photo of the ENIAC
The first general-purpose computer developed during World War II was ENIAC (Electronic Numerical Integrator and Computer). Its purpose was to compute ballistic firing tables and later became part of a feasibility study for the thermonuclear weapon.
In 1945, John von Neumann documented the primary elements of a computer in the “First Draft of a Report on the EDVAC”. EDVAC stands for Electronic Discrete Variable Automatic Computer, the successor of the ENIAC. EDVAC aimed to do more general calculations than just ballistic firing tables.
Von Neumann Architecture
The von Neumann architecture consists of four main components:
- A processing unit with both an arithmetic logic unit (ALU) and processor registers
- A control unit that includes an instruction register and a program counter
- Memory that stores data and instructions
- Input/output mechanisms
The figure below shows a simplified version where the processing and control units form one component.
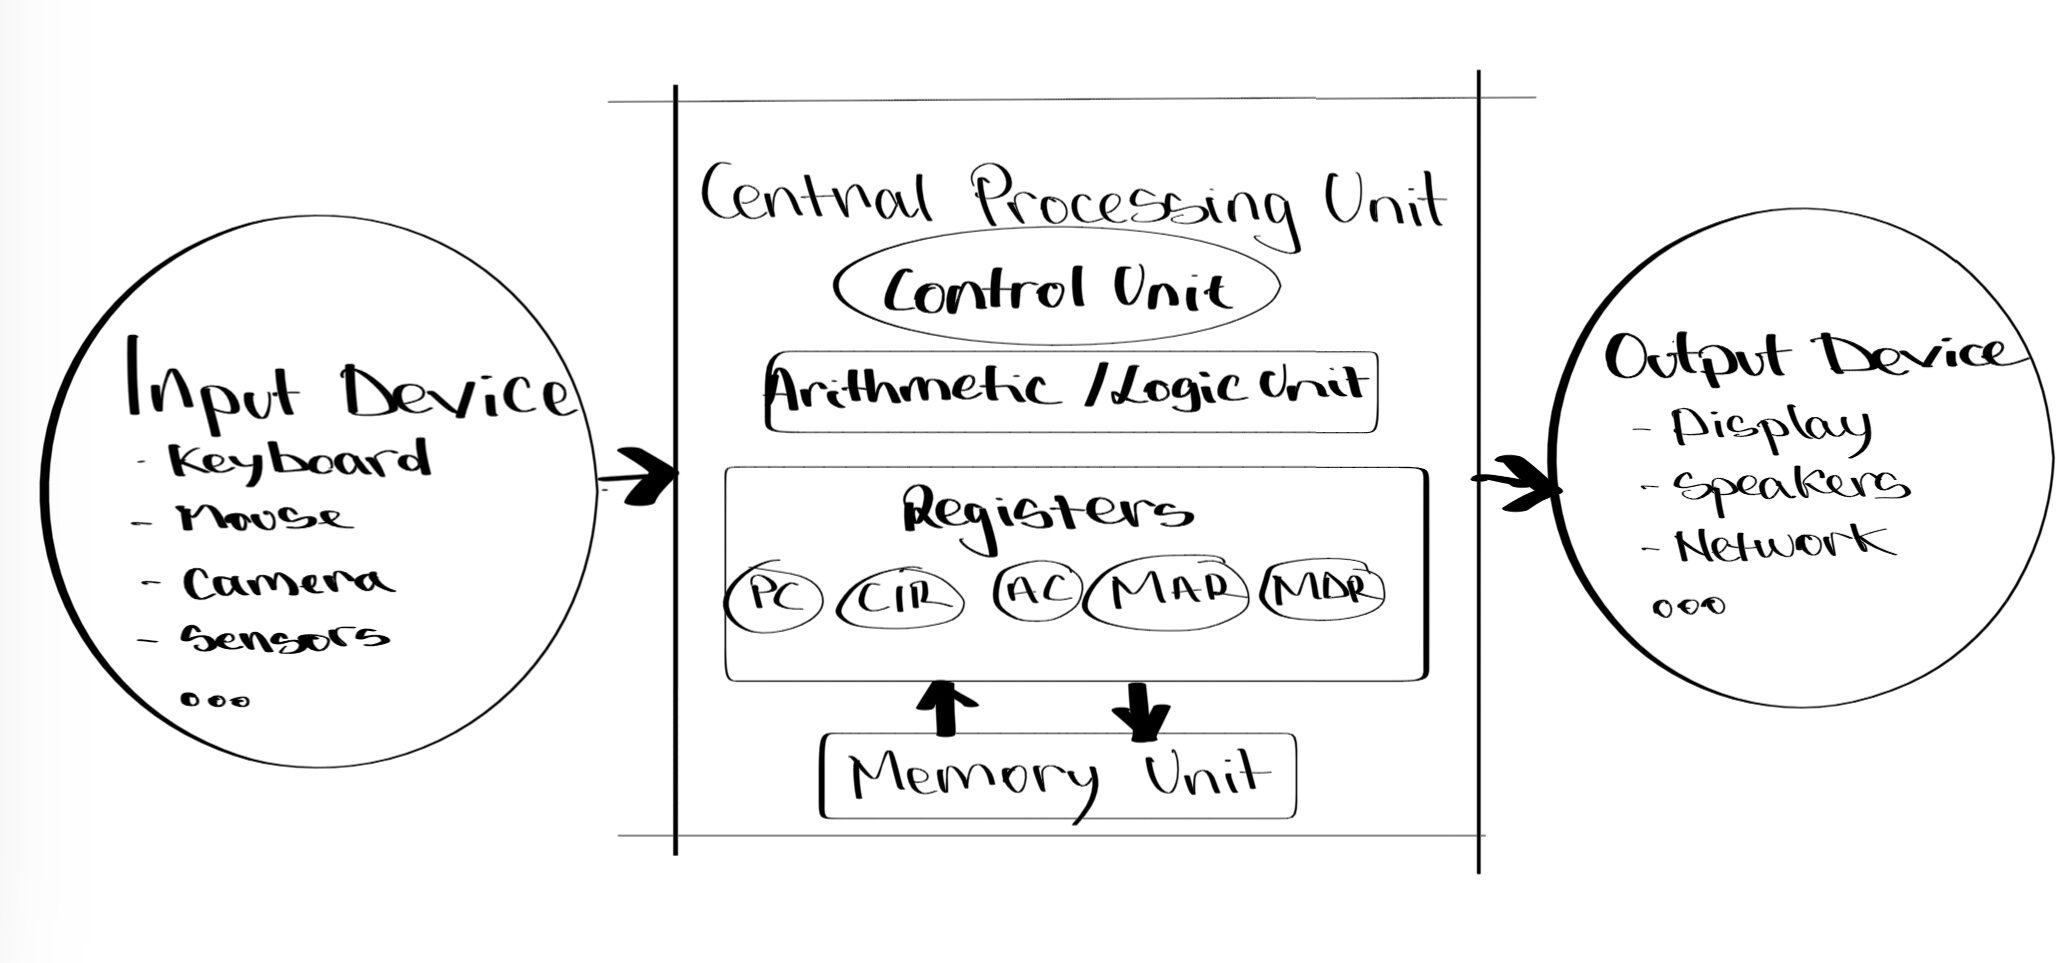
Von Neumann Architecture – Primary Elements of a Computer
Processing Unit Overview
The processing unit performs arithmetic and logical operations on data, while the control unit fetches, decodes and executes instructions. The memory holds both data and instructions in binary form, using the same address space. The input/output devices allow communication with external devices or users.
stored-program concept
The von Neumann architecture follows the stored-program concept, which means that the instructions are stored in memory along with the data and can be modified by the program. This allows for more flexibility and versatility than fixed-program machines, which require physical rewiring or redesigning to change the program.
fetch-decode-execute
The von Neumann architecture also implements the fetch-decode-execute cycle, which describes how a processor functions. The cycle consists of several steps:
- The program counter (PC) holds the memory address of the next instruction to be fetched.
- PC is copied into the Memory Address Register (MAR), and then incremented by one.
- The processor sends a signal to the memory address held in the MAR, and retrieves the instruction from there into the Memory Data Register (MDR).
- Instruction in the MDR is copied into the current Instruction Register (CIR), where it is decoded and executed.
- Processing results are stored in the Accumulator (ACC), or transferred back to memory or output devices.
- The cycle repeats until no more instructions are available or a halt instruction is encountered.
The following table summarizes the main registers used in the von Neumann architecture:
| Register | Function |
|---|---|
| PC | Holds the memory address of the next instruction to be fetched |
| MAR | Holds the memory address of the current instruction or data to be accessed |
| MDR | Holds the instruction or data retrieved from or sent to memory |
| CIR | Holds the instruction that is currently being decoded and executed |
| ACC | Holds the data being processed or the results of processing |
Advantages and Limitation of the Von Neumann Architecture
Advantages
Some of the advantages of the von Neumann architecture are:
- Simple and elegant, making it easy to design and implement.
- Dynamic and flexible programming, as instructions can be stored, modified and executed in memory.
- Widely used and supported by many hardware and software platforms.
Limitations
Some of the limitations of the von Neumann architecture are:
- It suffers from the von Neumann bottleneck, which means that data and instructions cannot be accessed simultaneously, since they share a common bus. This limits the speed and performance of the system.
- It has a limited memory capacity, as data and instructions compete for the same space.
- It is vulnerable to errors or attacks, as data and instructions can be corrupted or modified by malicious programs.
Conclusions and Further Developments
Von Neumann architecture is a fundamental computer architecture that provides the basis for many modern computers. It has several features that make it simple, versatile and powerful, such as the stored-program concept and the fetch-decode-execute cycle. However, it also has some drawbacks that affect its efficiency and security, such as the von Neumann bottleneck and the shared memory space. Therefore, many variations and improvements have been proposed and developed over time, such as cache memory, pipelining, parallel processing, Harvard architecture, RISC architecture, etc.
References and Further Reading:
- Davis, C., Barrett, R. and McLachlan, S. (2019) ‘Von Neumann architecture and its implications for parallel computing’, Journal of Computer Science, 15(3), pp. 345-356.
- GCSE Computer Science Revision (2020) Von Neumann architecture – Systems architecture – OCR. Available at: https://www.bbc.co.uk/bitesize/guides/zbfny4j/revision/3 (Accessed: 18 July 2023).
- Wikipedia (2021) Von Neumann architecture. Available at: https://en.wikipedia.org/wiki/Von_Neumann_architecture (Accessed: 18 July 2023).